
CommonSpot
™
Release 10.6
Getting Started Guide
Copyright 1998-2019 PaperThin, Inc. All rights reserved.
CommonSpot Release 10.6.0 Getting Started
This
CommonSpot Getting Started Guide
, as well as the software described in it, is provided under the
CommonSpot License Agreement and may be used, copied and distributed only in accordance with the
terms of the license. The content outlined in this manual is for informational purposes only and is subject
to change without notice. By no means should the information contained herein be construed as a
commitment by PaperThin, Inc. PaperThin assumes no responsibilities or liability for errors or inaccuracies
found in this documentation.
ColdFusion, Acrobat, and Flash are registered trademarks of Adobe Systems Incorporated. Microsoft,
Windows, Microsoft SQL Server, Microsoft Word, Excel, Edge, and PowerPoint are all registered trademarks
of Microsoft Corporation. MySQL, Solaris, and Oracle are registered trademarks of Oracle Corporation.
Chrome is a registered trademark of Google. Safari is a registered Apple trademark. Firefox is a registered
trademark of Mozilla. Lucee is a product of Lucee Association Switzerland; CKEditor is a registered
trademark of CKSource. Solaris is a trademark of Sun Microsystems, Inc. This document was last updated
October 2, 2019
Copyright 1998-2019 PaperThin, Inc. All rights reserved.
CommonSpot Release 10.6 Getting Started Guide
Table of Contents
Chapter 1 CommonSpot Directory Structures.........................................................................6
Chapter 2 Creating Your Site.................................................................................................. 9
Chapter 3 Understanding Templates....................................................................................14
3.1. Template Overview.................................................................................................................. 14
3.3. Base+1 (or Navigation) Templates...........................................................................................16
3.4. Content Templates.................................................................................................................. 16
3.5. Developing the Base Template................................................................................................. 17
3.6. Base Template Introduction..................................................................................................... 18
3.7. Importing HTML into the Base Template..................................................................................21
3.8. Replacing Content with CommonSpot Elements.......................................................................28
3.9. Replacing Content with Page Metadata....................................................................................30
3.10. Adding Content to the “Base+1” Template.............................................................................31
3.11. Lock Down Elements............................................................................................................. 32
3.12. Register Grid Row Layouts..................................................................................................... 33
Chapter 4 Developing Content Templates............................................................................36
4.1. Create a Page and Save as Template........................................................................................38
4.2. Define the Layout and Content for the Template......................................................................38
4.3. Changing Ghost Text.............................................................................................................. 39
4.4. Apply Restrictions to Elements as Appropriate.........................................................................40
.
3
CommonSpot Release 10.6 Getting Started Guide
4.5. Submit for Public Use.............................................................................................................. 41
Chapter 5 Next Steps........................................................................................................... 42
5.1. Users and Groups................................................................................................................... 42
5.2. Security.................................................................................................................................. 42
5.3. Personalization....................................................................................................................... 42
5.4. Content Reuse........................................................................................................................ 42
5.5. Managing and Creating Pages.................................................................................................43
5.6. Approval Process.................................................................................................................... 43
Chapter 6 PaperThin Resources............................................................................................ 44
6.1. CommonSpot ADF and the | commons....................................................................................44
6.2. Contacting PaperThin.............................................................................................................. 44
6.3. Contacting Technical Support.................................................................................................. 45
6.4. Contacting Sales..................................................................................................................... 45
Thank you for your interest in CommonSpot. This guide is for first-time developers and administrators looking for
step-by-step instructions for quickly getting a site up and running.
Please Note: This guide covers the basics of building a new site using CommonSpot and provides instructions for
migrating your web site’s design into CommonSpot. This document assumes a basic understanding of ColdFusion
development, web application development, and CommonSpot and its interface. This guide does not replace
CommonSpot Fundamentals or fast-track training or product documentation. For a basic introduction to
CommonSpot, please contact your account representative for information on training.
For usage and implementation details, see the
CommonSpot Contributor’s Reference
and the
CommonSpot
Administrator’s Reference.
Please refer to the following additional resources to learn more about CommonSpot:
CommonSpot Administrator’s Reference
.
4

CommonSpot Release 10.6 Getting Started Guide
CommonSpot Content Contributor’s Reference
CommonSpot Developer’s Guide
CommonSpot Elements Reference
CommonSpot Installation Guide
CommonSpot Template Developer’s Guide
Visit http://www.paperthin.com/ support/ to access the:
CommonSpot Document Library
Knowledge Base Articles
Product downloads and updates
In addition to these information sources, the CommonSpot community site, the | commons, is a valuable resource
for CommonSpot users and developers. Visit http://community.paperthin.com to learn about the Application
Development Framework (ADF), PaperThin’s open source framework for rapidly developing rich applications in
CommonSpot. This site is a platform for sharing information about CommonSpot and features applications built
by CommonSpot customers and the PaperThin professional services team, articles on everything from content
strategy to technical architecture, and the latest API.
.
5
CommonSpot Release 10.6 Getting Started Guide
Chapter 1 CommonSpot Directory
Structures
CommonSpot software is contained within the /commonspot directory, and multiple subdirectories. For the most
part, you will not need to modify any of the files in this file structure. However, for those special cases where you
want or need to, refer to the
CommonSpot Developer’s Guide
for more information.
During installation, CommonSpot will reference a /commonspot-data directory, which you need to create prior to
installation, to house non-web accessible files needed in CommonSpot and its sites. One special case is the cache
directory for each site, which lives in this directory structure:
c:\commonspot-data\customers\{users-datasource-name}\sites\{site-name}\mapped\cache
where:
‘users-datasource-name’ is the name of the datasource to the ‘users’ database under which the site lives
(i.e., there can be multiple users databases).
‘site-name’ is the name of the site.
For each top-level CommonSpot site, a new directory structure is created in the location that you specify during
installation. You can either create a root-level site, which assumes a path starting with ‘/’, or a non-root-level
site, which assumes a path starting with the name of the site (for example, /mysite/).
Whichever type of site you create, the resulting directory needs to be web-accessible, and will house all of the file
system files and subdirectories for the site (except cache files). By default, the following child directories are
created under the site’s root directory.
_cs_apps – used for ADF applications
_cs_resources – the default location for imported resource files
_cs_upload – the location where the primary copy of all uploaded documents are stored. A structure
mirroring the site’s directory structure will be maintained under here
_cs_xmlpub – the default location for XML publication files created by CommonSpot
.
6
CommonSpot Release 10.6 Getting Started Guide
_cs_widgets – the default location for Widgets downloaded from the PaperThin website
cs_customization – the default location where customization hooks should be stored.
** customcf – the default location for custom scripts for the root subsite
customfields – the default location where custom field type modules should be stored
datasheet-modules – the default location for the site’s datasheet modules
** images – the location where images are stored for the root subsite
** menuoverride – the location where menu override modules for the root subsite should be stored
renderhandlers – the site’s default directory where Render Handlers should be stored
** presentation – the location for the root subsite where files for the PowerPoint element are stored
style – the site’s default location for CSS files
** templates – the default location for Base Template modules for the root subsite
** upload – the location where publicly accessible uploaded documents are stored for the root subsite.
When a new site is created, no subsites exist in the site. Each time a subsite is created, additional directories are
added under the parent subsite. The starred directories above (**) are created for each subsite.
For example, if a ‘blog’ subsite is created under the root subsite, then a ‘blog’ directory will be created in the root
directory. It in turn will house the directories listed above with **.
CommonSpot also creates certain files automatically within each subsite (including the root subsite). These
include:
admin.cfm – navigates to the Subsite Administration page
Application.cfm – the application.cfm file for the subsite
createpage.cfm – launches the new page dialog
loader.cfm – internal module used to load dialogs
login.cfm – displays the default CommonSpot login form
.
7
CommonSpot Release 10.6 Getting Started Guide
override-getfile-error.cfm – the file to override the error messages displayed when trying to access an
uploaded file for the subsite
override-search-text.cfm - the file to override the search dialog for the subsite
Each time a page is created within CommonSpot, an addressable ColdFusion .cfm file is created in the subsite
folder. These are called “stub files” in CommonSpot.
.
8
CommonSpot Release 10.6 Getting Started Guide
Chapter 2 Creating Your Site
After CommonSpot is installed, you are ready to create your first site.
During installation, you created a ‘sites’ database (which manages information about all sites) and a ‘users’
database (which houses users and groups that can be shared across sites). Next, create a new database for your
‘site’.
Note: If your license allows multiple users databases, and you do not want your new site to share the users
database created at install time, you will need to create a new ‘customer’ and associated ‘users’ database.
Creating a new site is simple.
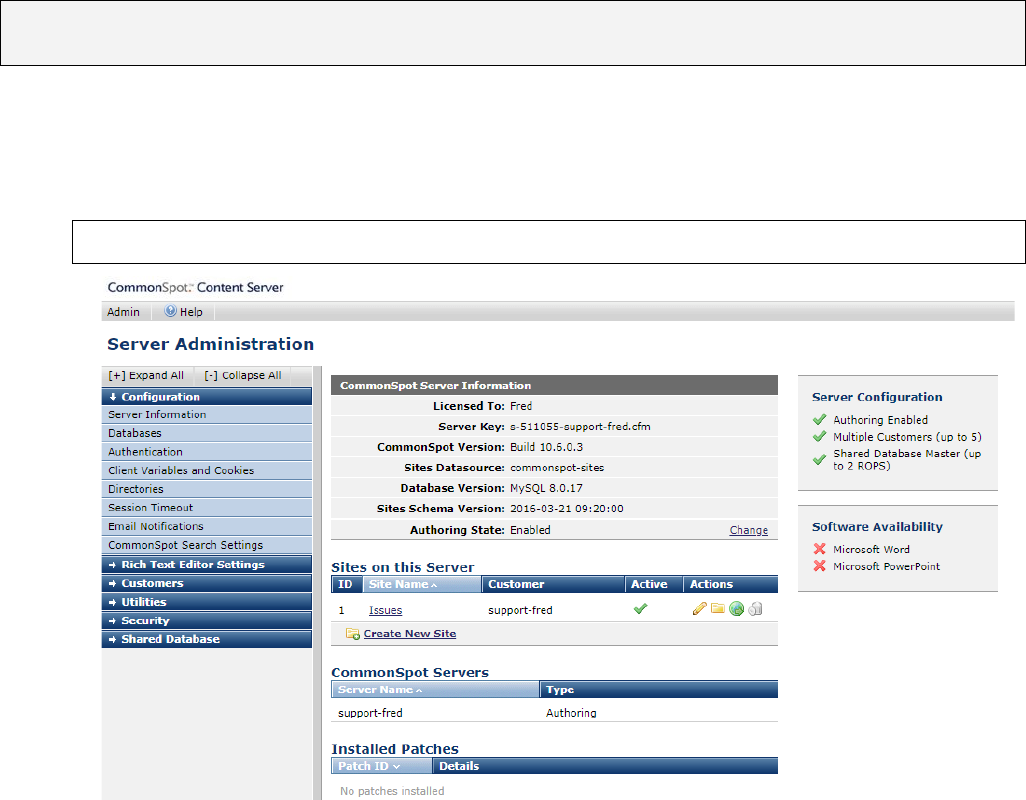
1. Navigate to CommonSpot Server Administration located at
{yourserver}/commonspot/admin/index.cfm
Click the Create New Site link at the bottom of the Sites on this Server section.
The New
Site
Information dialog lists the permissions you need to create a site. It also asks you to enter your ColdFusion
administrator password. Enter the password and click Next.
.
9
CommonSpot Release 10.6 Getting Started Guide
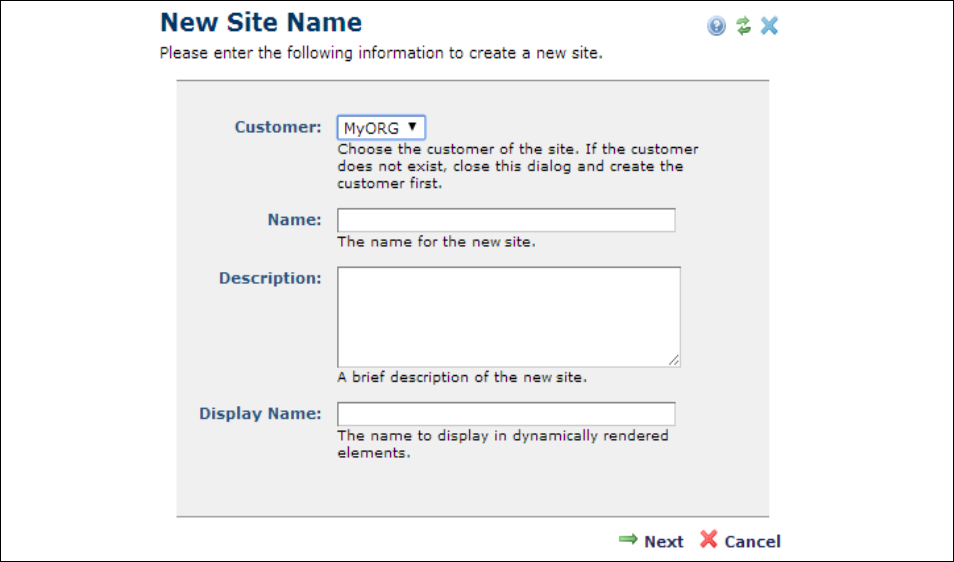
Use the New Site Name dialog to enter the following information:
Customer - If your license lets you have more than one customer, select the customer’s name to identify
the customer.
Name - This text sets the site’s directory name. This is where CommonSpot places all of your site’s files
and directories.
Description - CommonSpot displays this text only within administrative and authoring pages when
providing information about a site.
DisplayName - The text that CommonSpot uses within pages for links, breadcrumbs, etc.
If the license keys are for Shared Database, a checkbox to allow you to decide if the site will be
synchronized to your Read Only Production Server(s) will render at the bottom of the dialog.
After filling out these fields, click Next.
.
10
CommonSpot Release 10.6 Getting Started Guide
The New Site Configuration dialog gathers the information that CommonSpot needs to configure your site. The
Root Directory names the place where CommonSpot installs your site. Each site must have its own directory. By
default, CommonSpot installs new sites within this directory.
The Web Server Mapping checkbox tells CommonSpot if this site is located at the web server’s root. If checked,
CommonSpot installs the site within your web server’s root directory. For example, if your domain is
http://www.MyDomain.com and
mainsite
is your site’s root, users display your site’s pages by typing
http://www.MyDomain.com/ in their browser. If the site you are creating is not a root site, its address would be
http://www.MyDomain.com/mainsite/. This checkbox also lets CommonSpot know how it will store internal
path information.
.
11
CommonSpot Release 10.6 Getting Started Guide
Complete other fields to:
Set the new site’s IP address or alias
Name the ColdFusion or Lucee data source that CommonSpot creates
Select the database software used at your site
Provide the password for users with administrative privileges for the site
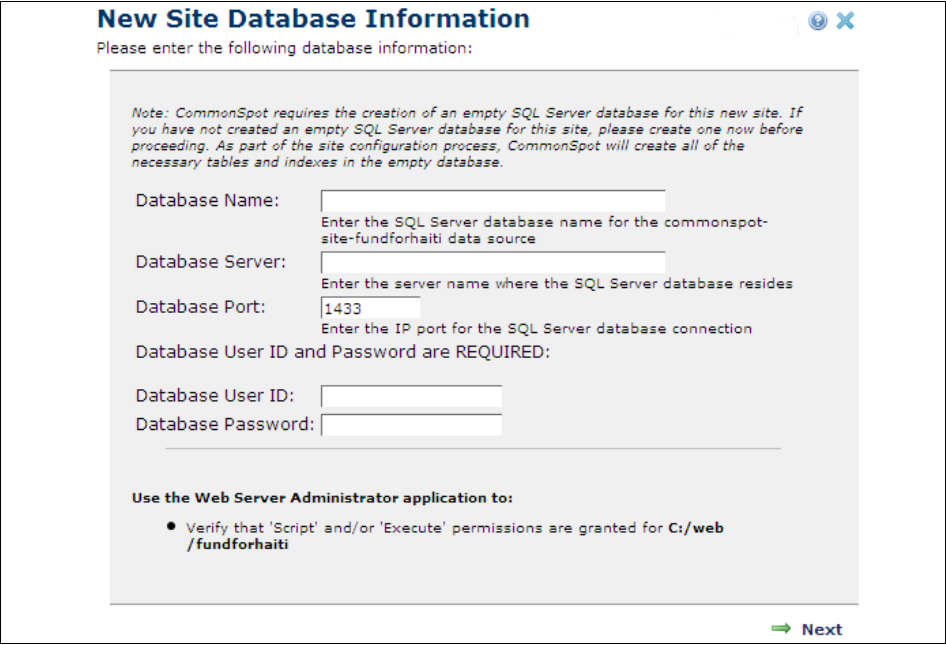
The remaining steps are installation-dependent. If you are using SQL Server or Oracle, you must configure the new
site’s database settings. If you are using SQL Server, the New Site Database Information dialog displays as shown
below.
After CommonSpot creates your site, it displays the New Site Created dialog, which has the following options:
OK – Returns you to the Server Administration dashboard.
.
12
CommonSpot Release 10.6 Getting Started Guide
Configure – Displays the CommonSpot Site Administration Dashboard. Here you can create new subsites,
set site and content security, define templates, and set other site parameters
.
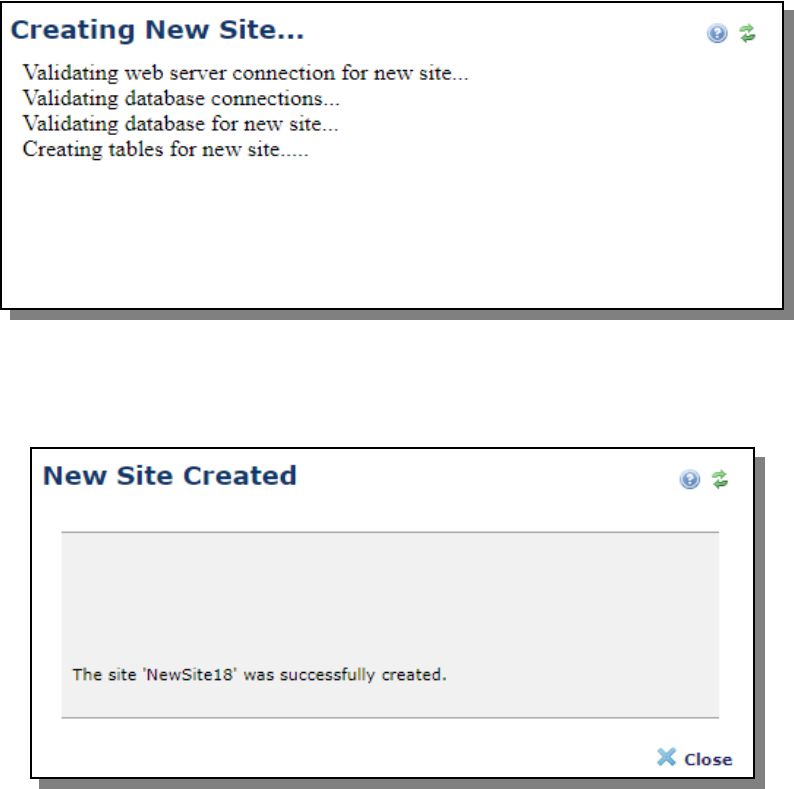
The next dialog walks through the actions taking place in the background… Additional dots appear as new tables
are created.
When the site creation process is complete, the confirmation dialog will appear. Closing this dialog refreshes
Server Administration and you will see the new site listed under “Sites on this Server”.
Chapter 3 Understanding Templates
Before implementing your web site’s design, it is helpful to understand how CommonSpot uses templates. This
chapter discusses how to use templates to create a site:
.
13
CommonSpot Release 10.6 Getting Started Guide
Template Overview
Base Templates
Base+1 (or Navigation) Templates
Content Templates
3.1. Template Overview
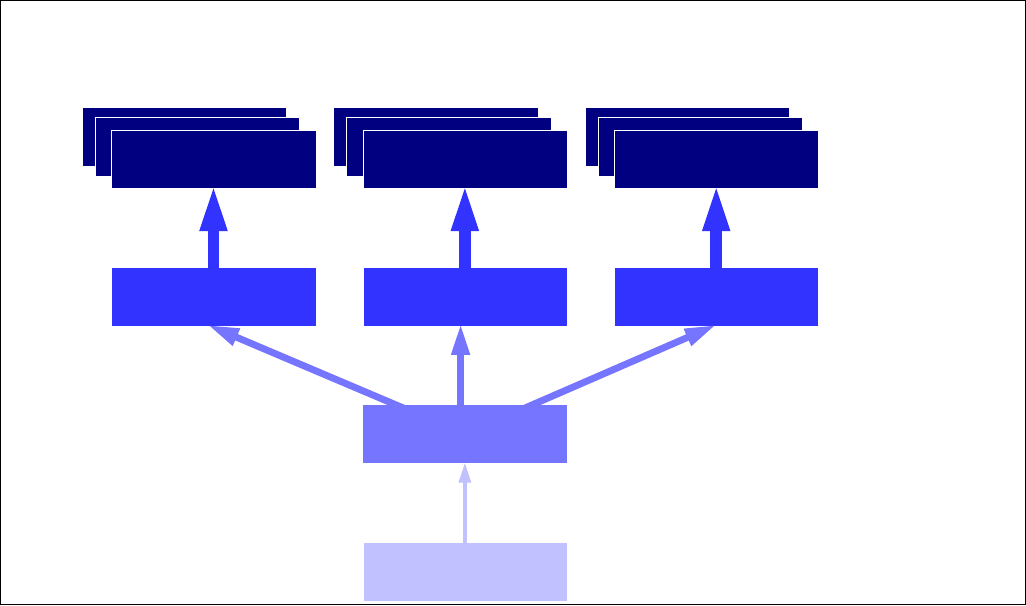
Every CommonSpot page derives from a template hierarchy. CommonSpot uses three kinds of templates:
Base Templates
Base+1 (or Navigation) Templates
Content Templates
It is also possible to have more templates in the hierarchy. Your site’s look and feel is defined within these
templates. Think of these templates as transparencies where content on lower-level templates shows through to
higher ones. At the page level, you see all of the templates in a hierarchy. This hierarchy is called an inheritance
structure.
.
14
CommonSpot Release 10.6 Getting Started Guide
Alumni Chapter
Content Template
Residence Hall
Content Template
Landing Page
Content Template
Base Template
(*.cfm module)
Landing Page Template
Alumni Chapter
Pages
Residence Hall
Pages
Landing
Pages
Inherits from
Content,
Navigation, and
Base Templates
Inherits from
Navigation and
Base Templates
Inherits from Base
Template
Base + 1
(Navigation Template)
Notice that in the diagram above all pages inherit from a Content template, and the Content Templates inherit
from the Base+1 Navigation template. The Base+1 template in turn inherits from the Base template.
This is typical for structured pages (pages that have a consistent look and feel and layout) where you want each
page of a specific type to derive from a Content Template that controls page presentation.
Note however, that it is not uncommon for unstructured pages (pages that have unique layouts) to inherit directly
from the Base+1 template.
It is a best practice not to derive pages directly from the Base Template.
3.2. Base Templates
A Base Template is your site’s blueprint and the starting point for page structure and design. A Base Template
contains any combination of HTML, ColdFusion, JavaScript, and CSS code that you want. It is created using a code
editor, and is referred to as a “hard” template.
.
15
CommonSpot Release 10.6 Getting Started Guide
Use the Base Template to lay out the main structure of the page, then programmatically invoke CommonSpot
elements to add content to the template(s) and page layers above. The elements you choose to invoke
programmatically, may be used to render a certain type of content (like a Link Bar element for the page’s top
navigation) or to define the layout of a section of the page (a Container element).
Because the Base Template is a ColdFusion module, you are free to use any conditional logic or other
programming constructs. You have complete access to all of the ColdFusion variable scopes, and can utilize any
ColdFusion functionality you desire.
For detailed instructions and information about the Base Template, refer to the
Template Developer’s Guide
and
the
Developer’s Guide
.
3.3. Base+1 (or Navigation) Templates
The Base+1 Template, also referred to as the Navigation Template, immediately follows the Base Template in the
hierarchy. In this template, you typically define the areas of the page “outside the white space,” that you want to
make consistent for each page. These typically are your page’s header, navigation, and footer areas.
The areas of the page “inside the white space” are typically defined in layers above this template.
Most CommonSpot sites have one navigation template but some have more. In all cases, they are essential
because they are the bridge between the Base and Content templates.
Keep in mind that your Base and Base+1 templates can be “smart” meaning they can dynamically render different
content based on certain criteria. You don’t have to make multiple templates. For example, you can use the
scheduling capabilities of the Container element to render different navigation based on the subsite, or you can
render different elements in the Base Template based on metadata from the page.
It is also common to lock down these elements on the Base+1 Template so they cannot be edited outside of this
template. This ensures that any changes at this template level will propagate the templates and pages above it.
3.4. Content Templates
While the Base and Base+1 templates work together to create the “outside the white space” areas of your site,
Content (soft) Templates structure that white space.
You may create one Content Template for each type of page you want on your site or use custom metadata to
dynamically control the layout of your pages. Some Content Templates will be used for specific content types (for
.
16

CommonSpot Release 10.6 Getting Started Guide
example, a Profile Detail page, a Blog Post page, a News Story page, etc). Others may define a common layout
(single column, two columns, three columns, etc).
On Content Templates you will generally include element types that you want content contributors to edit, and
restrict the Design, Style, and Admin permissions only, leaving Author/Edit permissions open. This allows content
contributors to edit content in the layer above the template (typically the page), but restricts them from changing
the element’s layout/rendering.
Content Templates can also have open or undefined areas of the page that give content contributors flexibility to
add free-form content to that section. For example, you may want the Profile Detail template to have two columns
where the Profile Custom Element appears and renders in the main column and the right column is open for
contributors to enter other content.
In this case, the Profile Detail template designer might configure the main whitespace Container Element as a grid
with two columns:
In the main column they would drop in the Profile custom element and define its layout to use a certain
Render Handler, restricting inheritance permissions to allow Authoring/Editing only.
In the second column, they might add another Container and leave it undefined, allowing contributors to
define it at the page level.
The Main Container would then be fully restricted, forcing the two-column layout to remain untouched and
consistent across all Profile Detail pages.
It is a best practice to design Content Templates so that all pages derived from it have a common look and feel so
that content contributors cannot change the page design when adding Elements.
3.5. Developing the Base Template
Modifying the Base Template that CommonSpot installs is the first step in building your site. It is where you define
the foundation for pages on your site. This chapter contains information you need to develop your site’s Base
Template. The contents of this chapter are:
Base Template Introduction
Importing HTML into the Base Template
Replacing Content with CommonSpot Elements
.
17
CommonSpot Release 10.6 Getting Started Guide
Populating the “Base +1” Template
Advanced Base Template Development
3.6. Base Template Introduction
Note: While you can create and register new Base Templates, PaperThin recommends that you modify the Base
Template that CommonSpot installs.
When CommonSpot creates a site, it creates the following three (3) templates:
Base Template – It is a ColdFusion module named template-basepage.cfm and resides in the
{yoursite}/templates/ directory.
Base+1 Template – It is a soft template named template-base-plus-one.cfm and it resides at your
site’s root.
There is also a Base Template named template-blanklayout.cfm that resides in the
{yoursite}/templates/ directory. It is very similar to the template-basepage.cfm, but we
recommend that this template be left alone, so that it can be used for testing purposes. If you need to
create a test page with no other elements, HTML, CSS or JavaScript you can create it from this template.
Before you begin, you need to understand a few Base Template coding conventions:
The Base Template only defines content/code that exists within a page’s <body></body> tags.
Base templates should only render HTML that is appropriate within the <body>and </body> tags. Your
code should not include the <doctype> declaration, starting <HTML> tag, or any part of the <head>
section.
If you do want to control the rendering of the <doctype> and <html> tags, and/or the contents of the
<head> section you can implement a custom ‘.head’ file. For more information, see the
CommonSpot
Developer’s Guide
.
CommonSpot uses enablecfoutputonly=”yes”
CommonSpot internally sets the ColdFusion enablecfoutputonly setting to ‘on’. Consequently, you must
place any HTML, CSS, or JavaScript that you want rendered within <cfoutput></cfoutput> tags. As a best
practice, you should not execute CFML from within these tags. Close your <cfoutput> before
programmatically instantiating any CommonSpot element, and then reopen the <cfoutput> tag after. For
example:
.
18
CommonSpot Release 10.6 Getting Started Guide
...
</cfoutput>
<CFMODULE TEMPLATE="/commonspot/utilities/ct-render-named-element.cfm
elementtype="container”
elementName="mainContent”>
<cfoutput>
...
Base templates may not execute on every request
CommonSpot has a sophisticated caching layer to optimize page load times. If the entire content of the
page is static, CommonSpot will cache the Base Template and its contents. Consequently you should not
rely on the Base Template running on each request. If a page is fully static, you will need to clear and
update its cache if you make changes to the Base Template. Refer to the
CommonSpot Developer’s Guide
for more information.
Load Required Resources
Within your Base Template, you can load any required external resources for the page using
CommonSpot’s resource loading framework. Starting with CommonSpot version 10.0, we recommend
using this technique instead of loading CSS resources through the CommonSpot Stylesheets User
Interface.
By making the appropriate LoadResource() API calls within your Base Template, CommonSpot will
properly load the resource’s CSS and JS files. The CSS files will be loaded in the page’s <head> section,
and JavaScript files will be loaded last within the <body> section of the page.
Remember, you only need to load resources that are required on the base template, or resources that will
be common to every page (such as JQuery and/or your responsive design framework (for example,
bootstrap). Those resources that are used for rendering a particular element on the page can be loaded
on-demand by that element, and do not need to be loaded within the Base Template. Refer to the
CommonSpot Developer’s Guide
for more information.
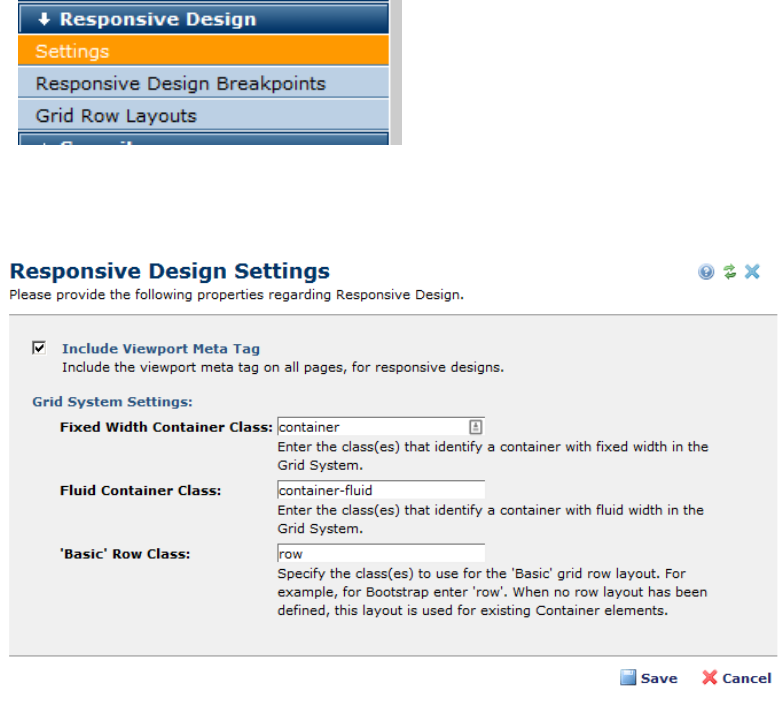
Configure for Responsive Design
If your site is designed to be responsive, which it should be, you will need to first configure
CommonSpot’s Responsive Design Settings.
Go to the Site Administration > Responsive Design > Settings dialog.
.
19
CommonSpot Release 10.6 Getting Started Guide
Within the Responsive Design Settings dialog, check the option to Include Viewport Meta Tag, and
configure the Grid System Settings for the responsive grid system you use.
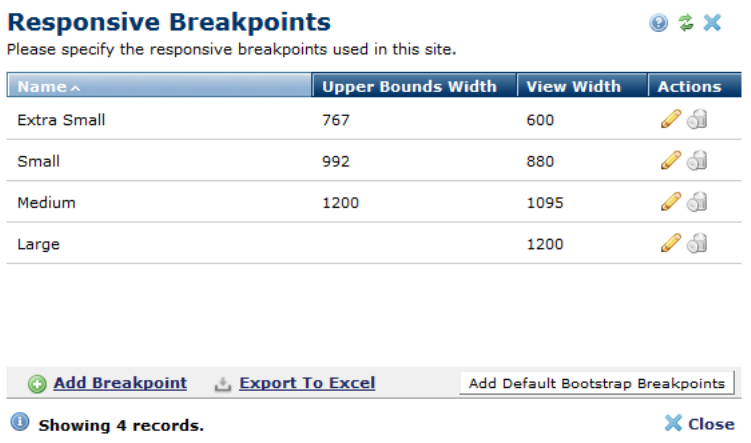
Then access the Responsive Beakpoints dialog and set up the breakpoint sizes that your grid system
implements.
.
20
CommonSpot Release 10.6 Getting Started Guide
CommonSpot uses the settings entered here to enable contributors to preview pages in the various device
sizes (phone, tablet, desktop, etc.) when authoring, editing, and approving.
3.7. Importing HTML into the Base Template
For most sites, the home page’s design differs significantly from the rest of the site, requiring two different Base
Template layouts. However, instead of physically creating a second Base Template file and registering it with
CommonSpot, we recommend having conditional logic in your template-basepage.cfm that cfincludes a different
template such as:
<!--- Include the layout file --->
<cfif request.subsite.id eq 1 AND cgi.script_name eq
'#Request.SubSiteCache[request.subsiteid].CFSubSiteURL#index.cfm'>
<cfinclude
template="#request.subsiteCache[1].url#templates/template-homepage.cfm">
<cfelse>
<cfinclude template="#request.subsiteCache[1].url#templates/template-
standard.cfm">
.
21
CommonSpot Release 10.6 Getting Started Guide
</cfif>
.
22
CommonSpot Release 10.6 Getting Started Guide
Here we create two ColdFusion modules, template-homepage.cfm and template-standard.cfm that will define
the different layouts of the Base Template. For purposes of this section, let’s concentrate on the non-homepage
layout.
As a best practice, we recommend creating a working HTML/CSS/JavaScript prototype containing each of the major
templates of your site, before trying to build your Base Template. This has several major advantages:
1. You can more quickly create the working HTML, CSS, and JavaScript that will be required when migrating
to CommonSpot as straight HTML.
2. You can produce a working site that is responsive to the varios devices you wish to support, making it
easier to get final approval of the design and its responsive interactions on all devices before migrating it
into CommonSpot.
3. You can test to ensure that your HTML, CSS, and JavaScript are fully functioning without errors across all
devices and browsers. It is easier to fix these at this point, as straight HTML, CSS, and JavaScript, than in
CommonSpot.
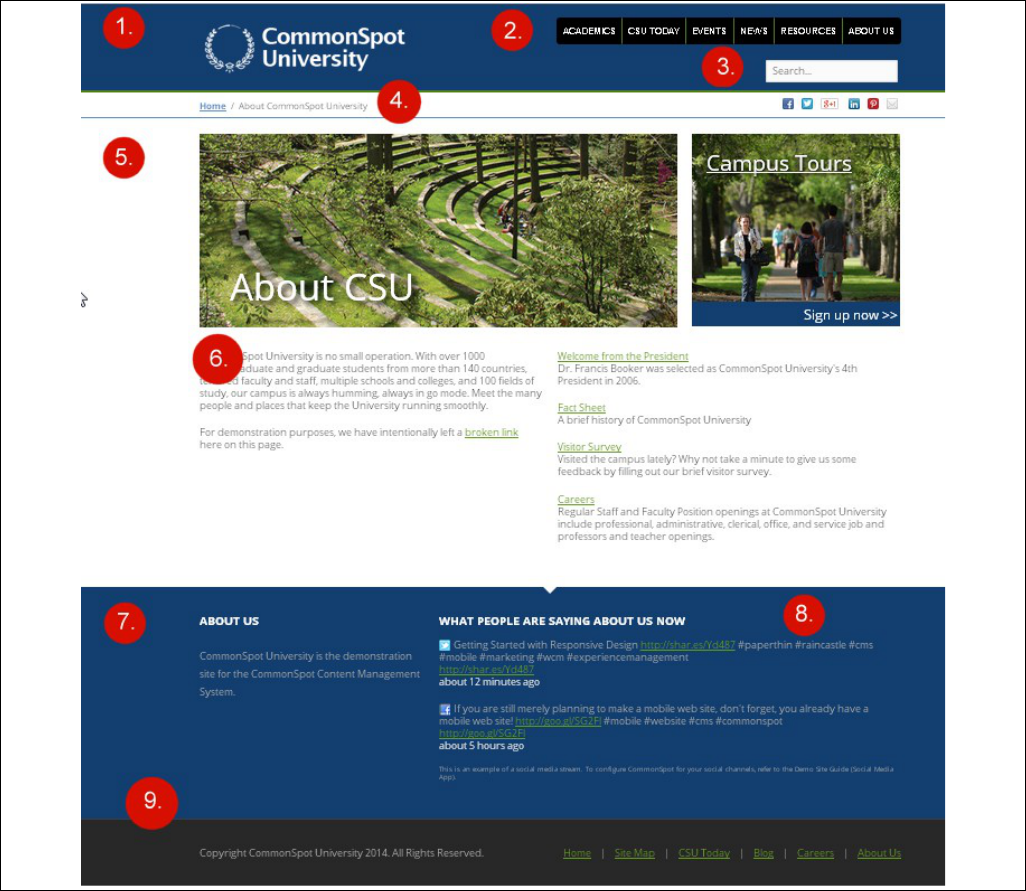
Once the working HTML prototype is complete you can begin to analyze the various elements that are common
across all pages and determine which areas of the page you want to allow contributors to edit. The following
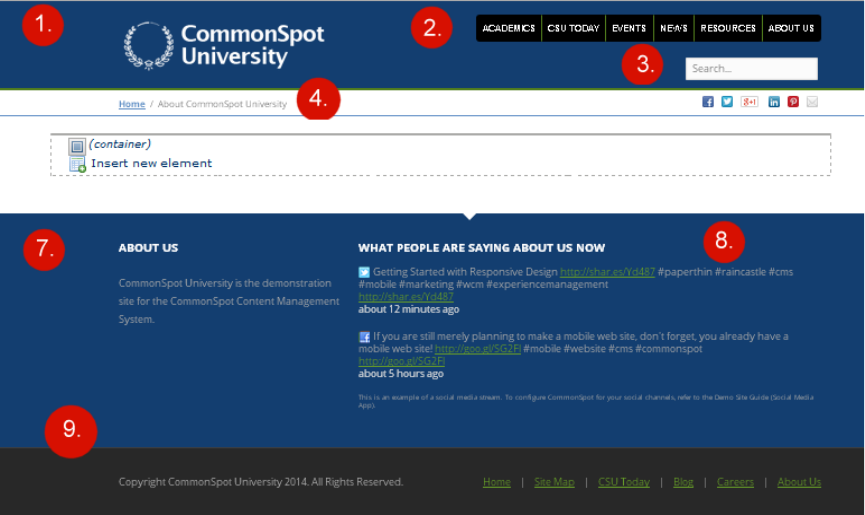
figure shows an example page, annotated to help you analyze the various sections of content.
.
23
CommonSpot Release 10.6 Getting Started Guide
1. Header Logo
2. Header Top-Level Navigation
3. Search control
4. Breadcrumbs
5. Main Page Container
.
24
CommonSpot Release 10.6 Getting Started Guide
6. White Space Content
7. Footer Texblock
8. Footer Social Feed
9. Lower footer (boilerplate copyright with linkbar navigation)
Let’s assume that all of the numbered areas, with the exception of areas 5 and 6, are common navigation and
design components that are consistent across all pages in the site (except the home page).
To begin building the Base Template, do the following:
1. Open the {yoursitedir}/templates/template-basepage.cfm file in a code editor.
2. In your browser, log in to your site by navigating to {yoursite}/login.cfm.
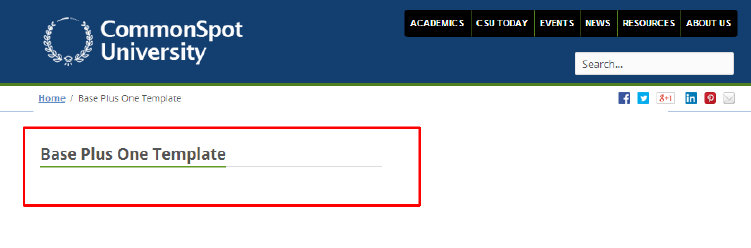
3. Because you can only see the results of changes to the Base Template through the browser, navigate to
the Base +1 Template. Open {yoursite}/template-base-plus-one.cfm in your browser.
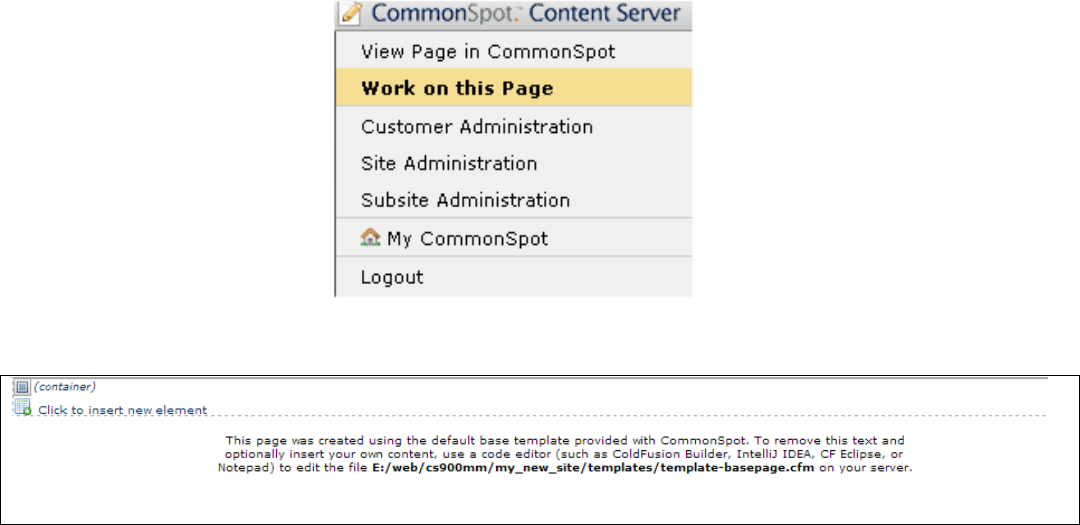
4. Click the entrance tab icon in the upper right corner of the CommonSpot page. Here CommonSpot
displays a pop-out menu, with menu options based on your permissions. Click Work on this Page.
5. The Base+1 Template page should look something like this:
.
25
CommonSpot Release 10.6 Getting Started Guide
6. Switch back to the Base Template in your code editor. You will notice that the
{yoursitedir}/templates/template-basepage.cfm file begins with a long comment. This text
contains instructions and tips for developing the Base Template.
7. Below the instructions and tips, you will see the following code:
<CFMODULE TEMPLATE="/commonspot/utilities/ct-render-named-element.cfm
elementtype="container”
elementName="mainContent”>
This code programmatically renders a CommonSpot element on the page. In this case, the element type is
a Container element and its unique instance name is ‘mainContent’. The Container element is the element
type that defines your site’s main content area (area 5 within the example page).
Since we want to incorporate all the other elements that the same design includes, comment out this code
and the code that renders the text below, and copy the following code into your Base Template file:
<!--- Include the layout file --->
<cfif request.subsite.id eq 1 AND cgi.script_name eq
'#Request.SubSiteCache[request.subsiteid].CFSubSiteURL#index.cfm'>
<cfinclude
template="#request.subsiteCache[1].url#templates/template-homepage.cfm">
<cfelse>
<cfinclude template="#request.subsiteCache[1].url#templates/template-
standard.cfm">
</cfif>
8. Create a new file named template-standard.cfm in your site’s /template directory, and copy in the full
HTML code from your prototype page. You will then need to do the following:
a. Wrapper your entire HTML code inside <cfoutput></cfoutput> tags.
<cfoutput>
<!--- your coded HTML code from prototype goes here --->
</cfoutput>
.
26
CommonSpot Release 10.6 Getting Started Guide
b. Remove any code prior to and including the <body> tag, and all code after and including the
</body> tag. Note any primary resources (CSS and JS) that you are loading. Remove any
references to loading these CSS and JavaScript files towards the end of your </body> section.
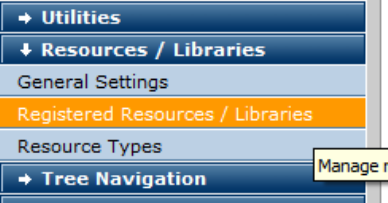
c. Register the resources that you just removed in CommonSpot under Site Administration >
Resources/Libraries >Registered Resources / Libraries.
For example, if your page had included jQuery and Bootstrap CSS and/or JS files, you might
register resources named ‘jQuery 1.11’ and ‘Bootstrap 3.3’, with corresponding aliases ‘jQuery’
and ‘bootstrap’.
See the
CommonSpot Developer’s Guide
and Resources and Libraries in the
Administrator’s
Reference
for more information.
d. Load the primary resources that you just registered by calling the CommonSpot LoadResource()
API at the top of the file before your first <cfoutput> tag.
<cfscript>
LoadResource(‘jQuery,Bootstrap’);
</cfscript>
e. Double up any pound signs (#) in your code so that ColdFusion does not throw any errors.
f. If you have any special classes or IDs on your <body> tag, or want a special tag in the <head>
section, see “Customizing the <doctype>, <html>, and <head> Tags” in the
Developer’s Guide
to
learn how to accomplish this.
You should now be able to reload the Base+1 Template in your browser and have it display the same page
output as your prototype.
.
27
CommonSpot Release 10.6 Getting Started Guide
3.8. Replacing Content with CommonSpot Elements
You are now ready to replace the hard-coded content within your design with CommonSpot Elements, so that
non-technical users can make changes to those elements through the CommonSpot UI. You will leave the page’s
HTML structure in your code, just replacing the HTML of the content with a CommonSpot element.
Let’s start by replacing the main whitespace area (areas 5 and 6 in our example).
1. Find the HTML that renders the main white space and replace it with the following code.
<CFMODULE TEMPLATE="/commonspot/utilities/ct-render-named-element.cfm
elementtype="container”
elementName="mainContent”>
The cfmodule call to ct-render-named-element programmatically inserts a CommonSpot Element into a
page. The elementType attribute tells CommonSpot which Element to insert (a list of which is in the Base
Template’s commented area). Use the elementName attribute to give that element a unique instance
name.
.
28
CommonSpot Release 10.6 Getting Started Guide
2. Reload the Base+1 Template again and you should now see the Container element rendering where the
main content block would have rendered. You will see a grey element icon representing the Container
element with ‘Insert new element’ ghost text.
3. Now for each of the other areas of the Base Template that you want managed in CommonSpot, you will do
the same thing. Identify the HTML and replace it with the proper corresponding CommonSpot element.
For example:
a. For the Header Logo in the upper left corner, you might replace it with the CommonSpot Image
element.
<CFMODULE TEMPLATE="/commonspot/utilities/ct-render-named-
element.cfm
elementtype="image-nohdr”
elementName="header-logo”>
.
29
CommonSpot Release 10.6 Getting Started Guide
Or, you may just decide to leave this in code, since it is unlikely to change.
b. For the Header Top-Level Navigation, you might replace it with a Linkbar or Tree Navigation
element
<CFMODULE TEMPLATE="/commonspot/utilities/ct-render-named-
element.cfm
elementtype="tree”
elementName="header-top-nav”>
c. You would continue this process for the rest of the elements on the template.
4. If you were to reload the Base+1 Template now, you would see several grey icons for each of the
CommonSpot elements that replaced the previous content, which is now gone.
3.9. Replacing Content with Page Metadata
Often your design might want to render the page’s title (or some other content) from the standard properties
given to it when a content contributor created the page or template.
CommonSpot exposes the page’s “Standard” and “Custom” Properties metadata through the request.page
structure.
You can render any of this content in your Base Template through ColdFusion. For example, the following would
render the page’s title as a primary header:
<h1>#request.page.title#</h1>
To see all variables present in this structure, simply dump the structure via
<cfdump var=”#request.page#”>
Here you can see how this might render in our example:
.
30
CommonSpot Release 10.6 Getting Started Guide
3.10. Adding Content to the “Base+1” Template
You are now ready to add content to the Base+1 Template for the element that you wish to control at this level of
the template hierarchy. Typically, this will be all the elements that are consistent across all pages. In our
example, it is everything except the Main Container element. For this element, we do
not
want to add content at
the Base+1 layer, but instead will add content in layers above it (in either Content Templates or pages that derive
directly from the Base+1 Template).
You add content to each element using the CommonSpot UI. The UI for each element type is different. Refer to
the
CommonSpot Elements Reference
for details about each element.
Note you may need to write and register element “Render Handlers” to display content exactly as you had it in your
prototype. If this is the case, you can use the HTML, CSS, and JS from your prototype to quickly “stub out” these
Render Handlers. See the
Developer’s Guide
for more information about writing Render Handlers.
.
31
CommonSpot Release 10.6 Getting Started Guide
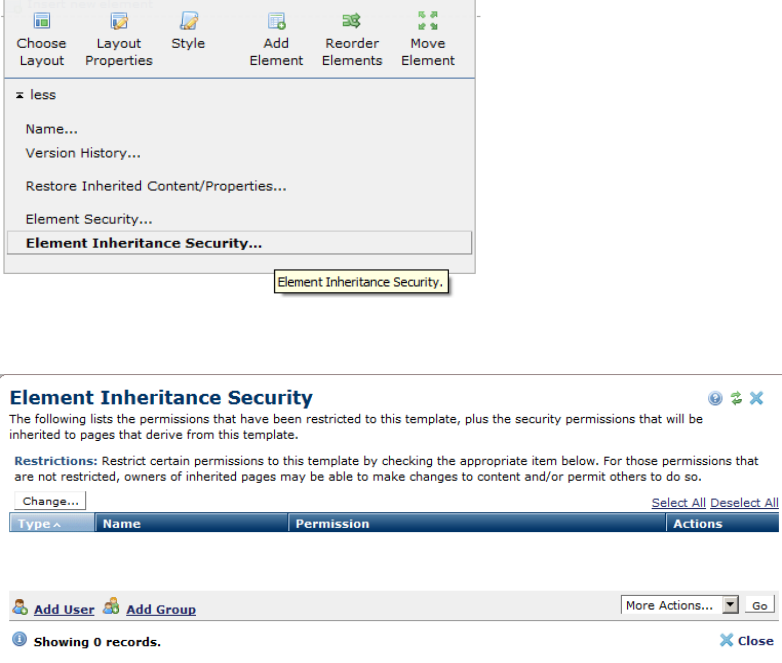
3.11. Lock Down Elements
Once you have the content for elements other than the main container added and rendering well, you will most
likely want to lock them down so that they cannot be edited outside of the Base+1 Template.
To do this, open each of the element’s menus and click the more link to open a submenu exposing additional
menu options.
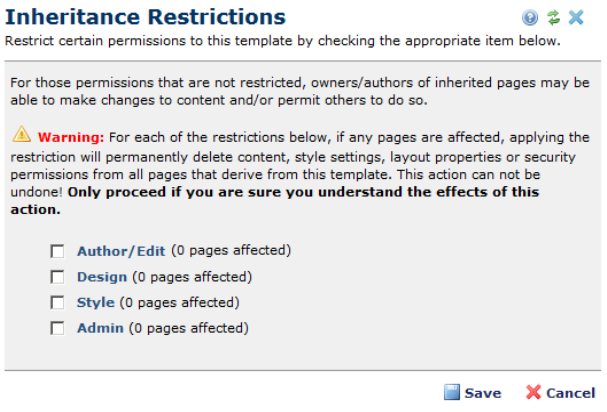
Choose the Element Inheritance Security option, and click the Change button under the Restrictions section.
Check all four (4) checkboxes for Author/Edit, Design, Style, and Admin.
.
32
CommonSpot Release 10.6 Getting Started Guide
Click the Save button. This will apply each restriction.
Applying all restrictions means that nothing for this element can be changed outside of this template.
If you now create a new page, and choose the Base+1 template in Author mode (Work on this Page), you should
see all of the content from the template, plus the Container element icon for editing the Container. You should
not see any element icons for the elements you locked down.
3.12. Register Grid Row Layouts
Now that you have built the Base+1 Template, and locked down all of the elements except the Main Container,
let’s focus on the content that will go into the whitespace.
The Container element in CommonSpot is a special element. It can hold other elements and can be configured to
render a responsive grid, with one or more elements in each cell of the grid. This makes it perfect for rendering
your whitespace area.
The next task before creating any Content Templates, is to register the ‘Grid Row Layouts’ that you want to make
available to contributors when they define the layout for each of the rows in the Container element. Example
layouts are simple:
One column: 100% wide
Two columns: 50%-50%
.
33
CommonSpot Release 10.6 Getting Started Guide
Two columns: 75%-50%
Three columns: 33%-33%-33%
Three columns: 25%-50%-25%
And so on…
To register grid row layouts go to Site Administration > Responsive Design. See the
CommonSpot Administrator’s
Reference
for more information.
2.1. Advanced Base Template Development
Some designs cannot use the techniques described in the preceding section. Navigation that changes by subsite,
content that uses dynamic code, or other similar techniques may lead you to believe that you need to create
multiple Base Templates. This is not so and not recommended. Having more than one Base Template complicates
inheritance and leads to a messy, hard-to-maintain site. In almost all cases, multiple Base Templates are
unnecessary, as CommonSpot lets you make your Base Template flexible.
Here are some of the more popular techniques:
Head section customization
If you need to place information within a page’s <head></head> tags, place it instead in a .head file. For
more information, see “Customizing the <doctype>, <html> and <head> Tag” in the
CommonSpot
Developer’s Guide
.
Style Sheets
Instead of using CommonSpot’s Stylesheet UI, we now recommend that you use the Resource Loading
framework that comes with version 10.0 and greater. See the
CommonSpot Developer’s Guide
and
Resources and Libraries in the
Administrator’s Reference
for details.
Custom Metadata
Sometimes a site’s layout must be flexible; for example, navigation links appear on the left on one page,
on the right on another, and not at all in yet another. Using custom metadata to control the layout, or
which options show on a page, lets contributors adjust attributes on the fly. See the
CommonSpot
Administrator’s Reference
,
CommonSpot Developer’s Guide
, and
CommonSpot Template Developer’s
Guide
for details.
.
34
CommonSpot Release 10.6 Getting Started Guide
Template Variables
Template variables are another way to add flexibility. You can add subsite-specific variables that an
Element can use to automatically adjust your Base Template. See the
CommonSpot Developer’s Guide
for
details.
Scheduled Content & Tree Navigation
Navigation that changes by subsite or by user is a common challenge when you are creating a Base
Template. There are several ways to do this using the Schedule Element or Tree navigation. See the
CommonSpot Elements Reference
and Trees in the
Administrator’s Reference
for details.
.
35
CommonSpot Release 10.6 Getting Started Guide
Chapter 4 Developing Content Templates
Once you complete Base and Base+1 templates, the next step is creating Content Templates that your site’s
contributors will use to add new pages to the site.
A Content Template establishes the layout and/or content for pages of similar content types within your site. A
best practice is to create one Content Template for each unique content type.
Examples of Content Templates may include:
News release page
Blog Post
Feature page
Profiles, etc.
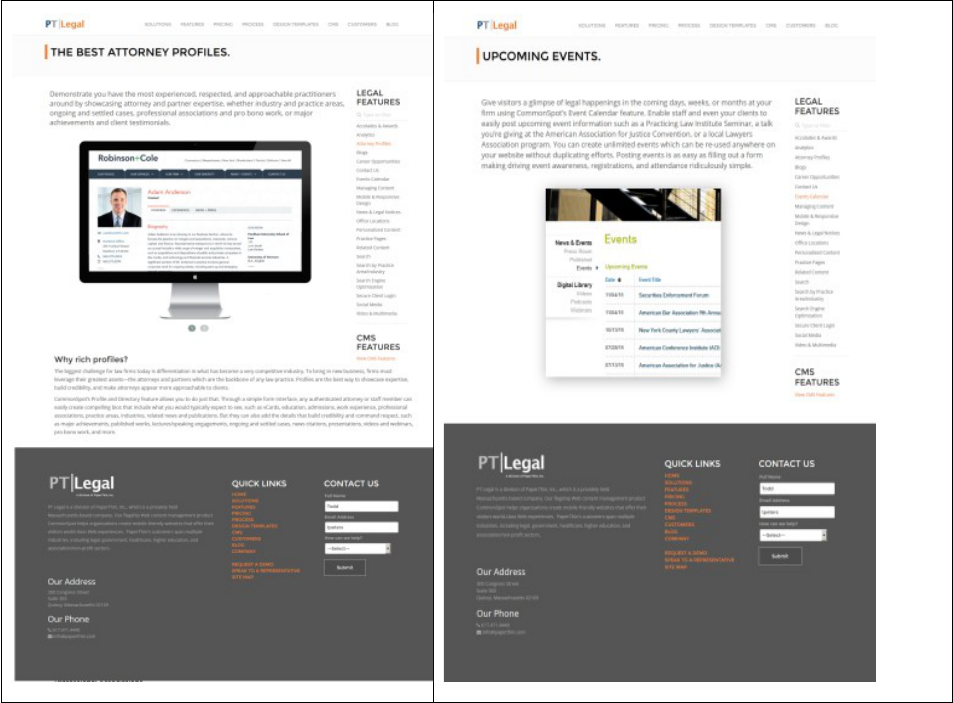
Here are screenshots from two “Feature” pages from one of PaperThin’s microsites. We will use these in our
example.
.
36
CommonSpot Release 10.6 Getting Started Guide
As you can see the white space of the pages have the same layout, to ensure consistency between the pages.
There are two columns.
The left column is wide, and displays text and images about the feature
The right column is narrow and displays a listing of other Features
To create a Content Template you simply do the following from within CommonSpot:
1. Create a page and save as a template.
2. Define the layout and content for the Template.
3. Set element ghost text.
4. Apply restrictions to elements as appropriate.
.
37

CommonSpot Release 10.6 Getting Started Guide
5. Submit for Public Use.
4.1. Create a Page and Save as Template
The first step in creating a Content Template is to create a new page from an existing template, one that most
closely aligns with your new template’s layout.
Typically, most Content Templates will derive from the Base+1 template, but you may have other layers of
templates in between.
Once the new page is created, simply save the page as a template, by selecting the Save as Template menu option.
Note that this template will not show in the Template Gallery until you submit it for public use in CommonSpot.
We will do that once the template’s content has been added and the appropriate elements locked down.
4.2. Define the Layout and Content for the
Template
The second step is defining the layout and/or adding the Elements that contributors will use when they add
content to pages built from this template.
In our example above, we might have done the following:
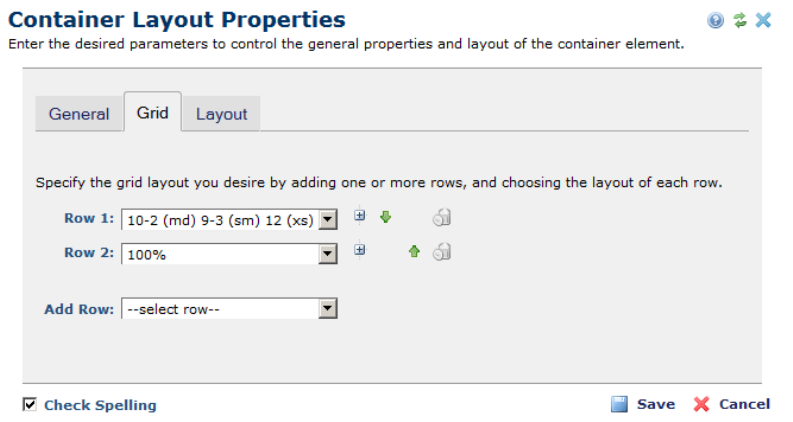
Defined the whitespace to have a grid with two (2) rows:
o The first row will have two (2) columns.
o The second row will have one column spanning 100% of the width
To do this we simply configured the Container’s Grid properties and chose the appropriate predefined
Grid Row Layouts
.
38
CommonSpot Release 10.6 Getting Started Guide
In the first cell of the first Row, we dropped the “Feature” custom element, and applied a Render Handler
to it to render the custom element data (the text and an image carousel).
In the second cell of the first row, we added another “Feature” custom element and configured it for
content reuse to return all Feature records, and applied a Render Handler that displayed them as a type-
ahead enabled list.
In the second row, we placed a Container element and a Formatted Textblock inside it, allowing for an
optional Textblock below the feature description, plus the ability to add other elements to the Container.
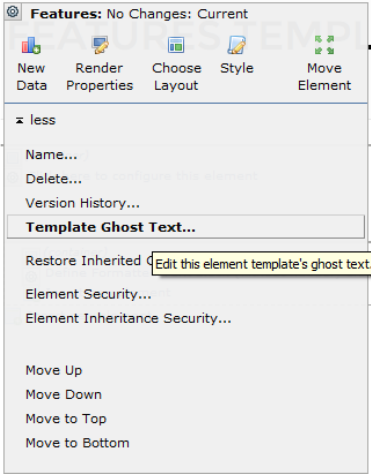
4.3. Changing Ghost Text
Each CommonSpot Element has ghost text that prompts the contributor to enter content. For example, the ghost
text for the Textblock Element is “Click here to enter textblock content” (similar to the ghost text displayed for
other Elements).
To change this ghost text — for example, if you want it to be “Add feature content” for the Feature Custom
Element — click the Element icon, choose Template Ghost Text from the dropdown menu, and change the text.
.
39
CommonSpot Release 10.6 Getting Started Guide
4.4. Apply Restrictions to Elements as Appropriate
With the template’s content, layout, and ghost text set, you need to decide which features contributors can modify
on pages derived from the template and which are locked down.
To apply restrictions for an element, simply select the Element Inheritance Security menu from the Element’s
dropdown menu. This sets inheritance for individual Elements within the template, as described in “Adding
Content to the Base +1 Template” above.
In our example, we would apply the following restrictions:
Main Container Element – Apply Author/Edit, Design, Style, and Admin restrictions. This effective locks
the entire element. Users will not be able to change the element in any way outside the template.
The “Feature” custom element (in column 1) - Apply Design, Style, and Admin restrictions. This allows
contributors to add/edit content on pages that derive from this template, but not change its layout, style
or security settings.
The “Feature” custom element (in column 2) - Apply Author/Edit, Design, Style, and Admin restrictions.
This effectively locks the entire element. Users will not be able to change the element in any way outside
the template.
.
40
CommonSpot Release 10.6 Getting Started Guide
The Container element in Row 2 - No restrictions, allowing for free-form content entry in pages that
derive from this template.
Important Note: If you
do not
implement inheritance security when you submit templates for public use, and
then later restrict inheritance, you risk losing any changes made in the interim to affected elements or templates.
For details, see the discussion of “Inheritance Restrictions” in the
Administrator’s Guide.
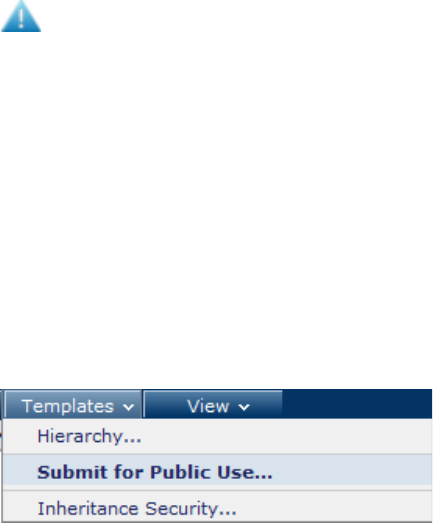
4.5. Submit for Public Use
In order for a template to appear in the CommonSpot Template Gallery, you need to submit the template for public
use.
Once you have added all the content, configured the template layout, added ghost text, and applied your
restrictions, simply select Submit for Public Use from the Templates menu.
This makes the template available for selection when contributors create new pages.
.
41
CommonSpot Release 10.6 Getting Started Guide
Chapter 5 Next Steps
With your Base Template in place, the base +1 template populated, and Content Templates ready to go, what else
is there? Depending on your site’s complexity, there may be many things to do before contributors can begin
using your templates to author pages. CommonSpot documentation will help you with all those tasks.
Here are a few of the more common ones:
5.1. Users and Groups
One of the most important goals of a content management system is to let non-technical staff assume
responsibility for creating and publishing content. However, you must add users and groups of users to
CommonSpot before they can create content. See the
CommonSpot Administrator’s Reference
for details on
creating and managing users and groups.
5.2. Security
From read permissions to author permissions to admin rights, CommonSpot security determines which users and
groups interact with content and to what extent. See the
CommonSpot Administrator’s Reference
for information
on setting up CommonSpot security.
5.3. Personalization
From individual Elements to entire pages, CommonSpot has robust mechanisms that let you serve up
individualized and targeted content. See the
CommonSpot Administrator’s Reference
and the
CommonSpot
Content Contributor’s Reference
for more information.
5.4. Content Reuse
Although most content is bound to the pages to which it was added, Custom Elements allow you to share and
syndicate content. See the
CommonSpot Administrator’s Reference
and the
Elements Reference f
or more
information.
.
42
CommonSpot Release 10.6 Getting Started Guide
5.5. Managing and Creating Pages
The most basic CommonSpot activity is creating pages. See the
CommonSpot Content Contributor’s Reference
for
information on managing and creating pages and authoring content.
5.6. Approval Process
If your site needs to define a workflow process that controls how content is published, you will need to set up an
approval process. For example, you may want all pages edited before they are published. See Approval and
Workflow in the
CommonSpot Administrator’s Reference
for more information.
.
43

CommonSpot Release 10.6 Getting Started Guide
Chapter 6 PaperThin Resources
PaperThin offers a full range of professional services to help you leverage your investment in CommonSpot.
Whether it is architecting and designing your site, customizing CommonSpot's capabilities, building specialized
components, integrating critical business applications, or helping you with installation and training, PaperThin has
the experience and knowledge to assist you with the following resources:
CommonSpot ADF and the | commons
Contacting PaperThin
Contacting Technical Support
Contacting Sales
For more information about PaperThin Professional Services visit us at http://www.paperthin.com.
6.1. CommonSpot ADF and the | commons
The CommonSpot Application Development Framework is a tool for rapidly developing rich applications in
CommonSpot.
http://community.paperthin.com, or the | commons, is a resource for the CommonSpot community for:
Questions, answers, and feedback.
Downloading applications built by other CommonSpot customers, as well as the PaperThin professional
services team
Articles on everything from content strategy to technical architecture
6.2. Contacting PaperThin
PaperThin, Inc. 300 Crown Colony Drive , Suite 503
Quincy, MA 02169
Phone: 617.471.4440
Fax: 617.471.4465
.
44

CommonSpot Release 10.6 Getting Started Guide
http://www.paperthin.com
6.3. Contacting Technical Support
Technical Support is available Monday through Friday 8:00 a.m. to 6:00 p.m. EST, except on holidays. Full details
of support plans and options are on our web site at: http://www.paperthin.com/support
6.4. Contacting Sales
Phone: 617.471.4440 (option 1)
Fax: 617.471.4465
E-mail: [email protected]
.
45
