
© 2017 Forcepoint
Creating Custom Block Pages
Custom Block Pages | Web Protection Solutions | v8.4.x | 31-July-2017
When Forcepoint web protection policies are used to block a user from accessing a
website or cloud application, a block page is displayed in the user’s browser. This
block page is constructed from a series of HTML, CSS, and JavaScript files. You can
customize the block page to adapt it to the needs of your organization and your end
users.
It is helpful to have HTML, CSS, and JavaScript knowledge before attempting to
create custom block pages. Excellent HTML and CSS reference information is
available from w3schools.com
.
The articles in this collection describe how to use the default block pages supplied
with your on-premises web protection software as a template for creating your own
customized block pages. It is also possible to:
● Create your own HTML files from scratch, then configure Filtering Service to
pull in content from those files when it generates a block page.
See Using an al
ternate
block page on another machine in the Administrator
Help.
● Display custom content in the top frame of a block page only, without
customizing the entire block page.
See Creating alternate block messages
in the Administrator Help.
● Customize the block pages used by the hybrid service.
See Customizing hybrid block pages
in the Administrator Help.
To create custom block pages based on the default block pages, see:
● Get started with block page elements, page 2
● Edit block page files (overview), page 6
● Change the size of the message frame, page 10
● Change the block page logo, page 11
● Block page content variables, page 15
● Reverting to the default block pages, page 17

Creating Custom Block Pages 2
Get started with block page elements
Custom Block Pages | Web Protection Solutions | v8.4.x | 31-July-2017
The standard block pages included with your web protection solution contain the
following elements:
1. The header explains that the site is blocked.
2. The top frame contains a block message showing the requested URL and the
reason the URL was blocked.
3. The bottom frame presents any options available to the user, such as the option to
go back to the previous page, or to click a Continue or Use Quota Time button to
view the site.
Warning
Do not edit the default block page files directly. Instead,
follow the instructions in Edit block page files (overview),
page 6, to make a copy of the files as a template for your
custom block pages.
Creating Custom Block Pages 3
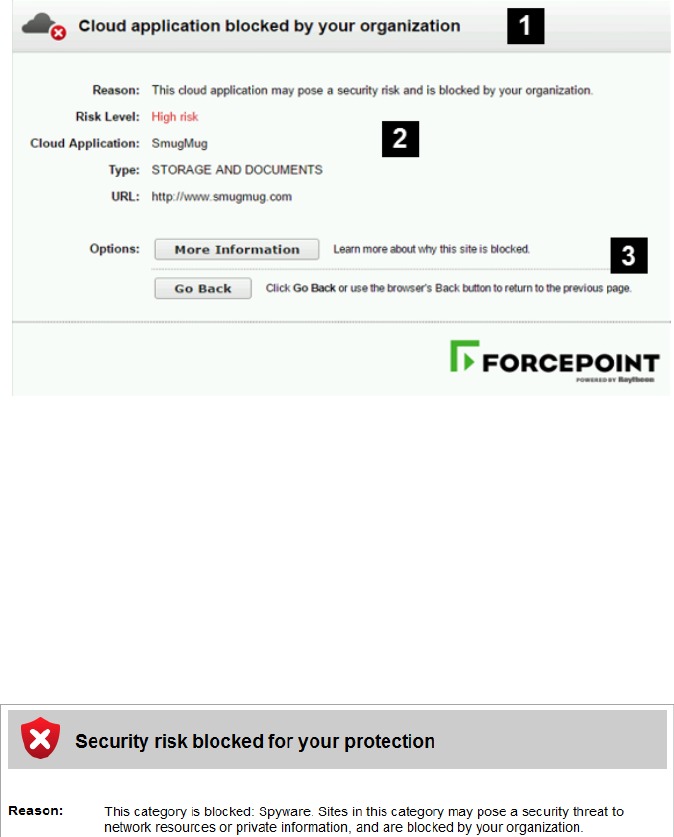
When a cloud application is blocked, the block page contains similar elements:
1. The header explains that the application is blocked.
2. The top frame contains a block message showing the requested application and
the reason the application was blocked.
3. The bottom frame presents any options available to the user, such as the option to
go back to the previous page, or to click a Continue or Use Quota Time button to
view the site.
If the site is blocked because it belongs to a category in the Security Risk class, the
block page has a special header:
The block page is created from multiple files that are stored with each instance of
Filtering Service in your network. This includes V-Series appliances and Windows
and Linux servers.
● On Windows servers, block pages are found in the following folder:
C:\Program Files\Websense\Web
Security\BlockPages\<language_code>\Default
or
C:\Program Files(x86)\Websense\Web
Security\BlockPages\<language_code>\Default
● On Linux servers, block pages are found in the following directory:
/opt/Websense/BlockPages/<language_code>/Default
Creating Custom Block Pages 4
● On V Series and X Series appliances, a series of appliance API calls are available
for downloading and uploading block page files. See Working with block page
files on appliances, page 8.
There are 2 primary HTML files used to construct block pages:
● master.html constructs the header and top frame for the block page, and uses one
of the following files to display appropriate options in the bottom frame
● block.html contains the text for the top frame of the block message, which
explains that access is restricted, lists the requested site, and describes why the site
is restricted.
In addition, several supporting files are used to supply the text content, styles, and
button functionality used in block pages:
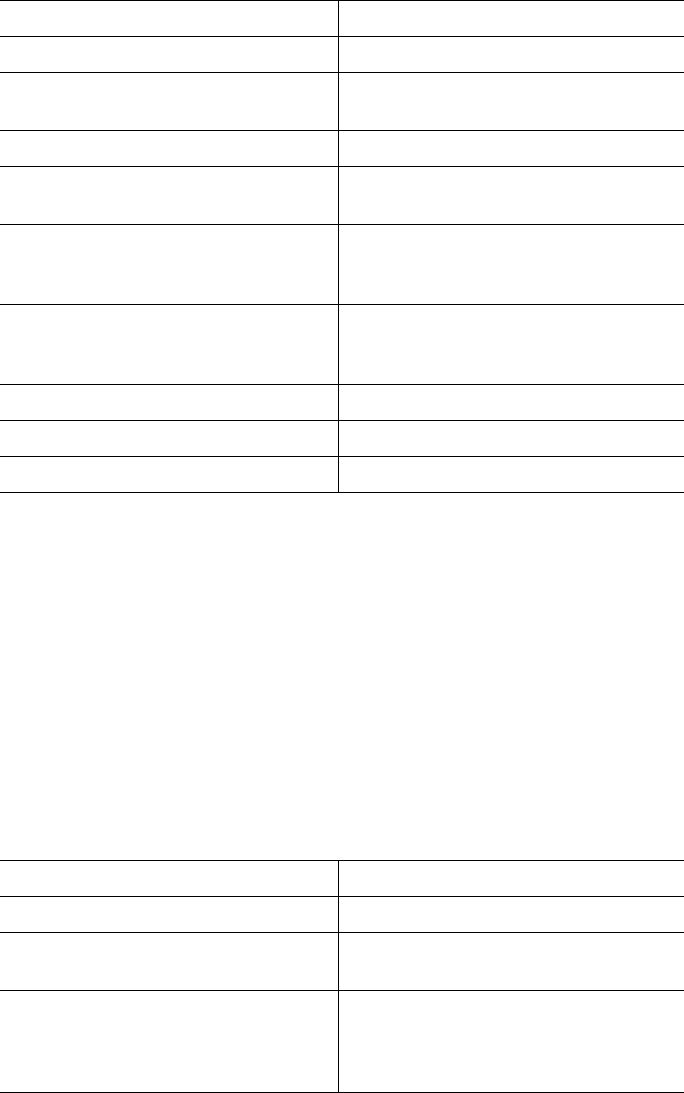
File Name Contents
blockFrame.html Text and button (Go Back option) for sites in
blocked categories.
continueFrame.html Text and buttons for sites in categories to which the
Confirm action is applied.
quotaFrame.html Text and buttons for sites in categories to which the
Quota action is applied.
moreInfo.html Content for the page that appears when a user clicks
the More information link on the block page.
casbMoreInfo.html Content for the page that appears when a user clicks
the More Information link on the cloud
application block page.
File Name Description
blockStyle.css Cascading style sheet containing most block page styles
master.css Cascading style sheet containing styles for block page
popups (like the account override popup)
casbBlock.html Provides a cloud application block message along with
the reason access is restricted, risk level, cloud
application name, type, and URL.
popup.html When an embedded page is blocked, this file is used to
display the full-sized block page popup.
block.inl Provides tools used in constructing the block frame of
the block page
blockframe.inl Provides additional information for standard block
pages
continueframe.inl Provides additional information for the block frame
when users have a “Continue” option
Creating Custom Block Pages 5
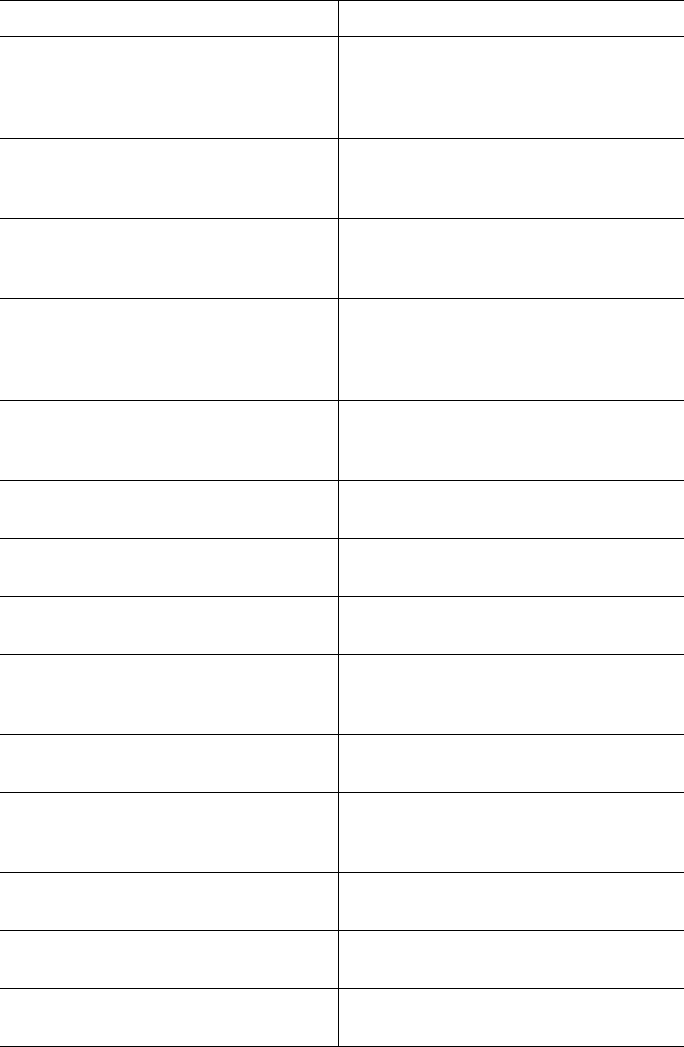
The Web DLP module adds the file policyViolationDefaultPage.html, which
provides block page content when Web DLP components block content from being
posted or downloaded.
quotaframe.inl Provides additional information for the block frame
when users have a “Use Quota Time” option
base64.js JavaScript file used to support credential encryption
when users have an “Account Override” option. This
file should not be changed or removed.
master.js JavaScript file used in construction of a standard block
page
security.js JavaScript file used in construction of a security block
page
messagefile.txt Contains text strings used in block pages
Copyright.txt Copyright information for Forcepoint block pages
master.wml WML file with basic blocking information
File Name Description
Creating Custom Block Pages 6
Edit block page files (overview)
Custom Block Pages | Web Protection Solutions | v8.4.x | 31-July-2017
Before creating custom block pages, keep in mind that each Filtering Service instance
in your network will need its own copy of the block pages.
As a best practice, customize your files on a test server. Then, when they are finalized,
distribute them to the appropriate “Custom” folder on each server or appliance that
hosts a Filtering Service instance.
To get started:
1. If Filtering Service resides on a Windows or Linux server, navigate to the default
block page directory. For English:
Websense/Web Security/BlockPages/en/Default
2. Make a copy of the block pages.
■ If Filtering Service resides on a Windows or Linux server, copy the block
page files to the custom block page directory. For English:
Websense/Web Security/BlockPages/en/Custom
■ If Filtering Service resides on an appliance, use the API to download the files
you want to edit. See Working with block page files on appliances, page 8.
Next, select the files you want to edit and click Download File(s).
3. Open the first file you want to edit in a text editor or HTML editor.
4. Modify the text. The files contain comments that guide you in making changes.
Do not modify the tokens (enclosed by $* and *$ symbols), or the structure of the
HTML code. These enable Filtering Service to display specific information in the
block message.
For detailed instructions on making specific types of edits, see:
■ Change the size of the message frame, page 10
■ Change the block page logo, page 11
■ Block page content variables, page 15
Important
Do not modify the original block message files in the
BlockPages/<lang_code>/Default directory. Copy them
to the BlockPages/<lang_code>/Custom directory and
then modify the copies.
Warning
Some HTML editors modify HTML code, which could
corrupt the files and cause problems displaying the block
messages. Make sure to use an editor that will not insert
changes beyond those you intend to make.
Creating Custom Block Pages 7
5. Some block page HTML files use hard-coded paths to reference the support files
used to construct the page. If you have modified the stylesheet used to format the
block pages (blockStyle.css) or the JavaScript file used to construct security block
pages (security.js), make sure that you also update the path to those files in your
custom HTML files. For example:
<link rel="stylesheet" href="/en/Custom/blockStyle.css
type="text>
6. Save the file.
7. For appliances, upload the edited file and restart Filtering Service. See Working
with block page files on appliances, page 8.
8. For Windows and Linux servers, use the Status > Deployment page in the Web
module of the Forcepoint Security Manager to restart Filtering Service.
Block page changes do not go into effect until you restart Filtering Service.
You can easily resume using the default block pages at any time, if needed. See
Reverting to the default block pages, page 17.
Creating Custom Block Pages 8
Working with block page files on appliances
Custom Block Pages | Web Protection Solutions | v8.4.x | 31-July-2017
Version 8.4 uses a series of API commands for managing block page files on V and X
Series appliances.
Introduction
In the commands below:
● Syntax for using the curl tool is shown. Other tools may also be used to
communicate with the RESTful appliance API, such as the Postman app.
● <c_interface> is the IP address of the appliance communication (C) interface.
● <password> is the password for the appliance admin account.
The appliance API requires basic authentication to enable communication
between the client and the appliance.
● The available language codes (<lang_code>) are:
Block page commands
List files in the Default block page directory:
curl -k -u admin:<password> -X GET https://<c_interface>/
wse/customblockpage/list/default/<lang_code>
List files in the Custom block page directory:
curl -k -u admin:<password> -X GET https://<c_interface>/
wse/customblockpage/list/custom/<lang_code>
List files in the block page Images directory:
curl -k -u admin:<password> -X GET https://<c_interface>/
wse/customblockpage/list/images
Get a file from the Default block page directory:
curl -k -u admin:<password> -X GET https://<c_interface>/
wse/customblockpage/file/default/<lang_code>/<filename>
Code Language Code Language
de German ja Japanese
en English pt_BR Portuguese
es Spanish zh_CN Simplified Chinese
fr French zh_TW Traditional Chinese
it Italian
Creating Custom Block Pages 9
Get a file from the Custom block page directory:
curl -k -u admin:<password> -X GET https://<c_interface>/
wse/customblockpage/file/custom/<lang_code>/<filename>
Get an image from the Images directory:
curl -k -u admin:<password> -X GET https://<c_interface>/
wse/customblockpage/images/<filename>
Upload a custom block page file to the appropriate Custom directory:
curl -k -u admin:<password> -X PUT -F "file=@./<filename>"
https://<c_interface>/wse/customblockpage/file/<lang_code>
For example:
curl -k -u admin:*My3Password -X PUT -F "file=@./
master.html" https://10.115.75.30/wse/customblockpage/file/
en
Upload a custom block page image to the Images directory:
curl -k -u admin:<password> -X PUT -F "file=@./<filename>"
https://<c_interface>/wse/customblockpage/images
For example:
curl -k -u admin:*My3Password -X PUT -F "file=@./mylogo.png"
https://10.115.75.30/wse/customblockpage/images
Delete a file from the Custom directory:
curl -k -u admin:<password> -X DELETE https://<c_interface>/
wse/customblockpage/delfile/<lang_code>/<filename>
Delete an image from the Images directory:
curl -k -u admin:<password> -X DELETE https://<c_interface>/
wse/customblockpage/delimage/<filename>
Stop and then start Filtering Service to cause your changes to take effect:
curl -k -u admin:<password> -X PUT https://<c_interface>/
wse/admin/filter/stop
curl -k -u admin:<password> -X PUT https://<c_interface>/
wse/admin/filter/start
Creating Custom Block Pages 10
Change the size of the message frame
Custom Block Pages | Web Protection Solutions | v8.4.x | 31-July-2017
Depending on what information you want to provide in the block message, the default
width of the block message and height of the top frame may not be appropriate.
To change these size parameters in the master.html file:
1. Get a copy of the master.html file to edit:
■ On Windows and Linux servers, copy master.html from the Websense/
BlockPages/<lang_code>/Default directory to Websense/BlockPages/
<lang_code>/Custom.
■ On appliances, use the following API command:
curl -k -u admin:<password> -X GET https://
<c_interface>/wse/customblockpage/file/default/
<lang_code>/master.html
2. Open the copy in the Custom directory with a text editor or HTML editor.
3. To change the width of the message frame, edit the following line:
<div style="border: 1px solid #A6A6A6;width: 95%; max-width:
700px; ...>
Change the value of the width and max-width parameters as required.
4. Save and close the file.
5. Do one of the following to apply your changes:
■ For Filtering Service instances on Windows and Linux servers, use the
Status > Deployment page in the Web module of the Forcepoint Security
Manager to restart Filtering Service.
■ For Filtering Service instances on appliances, first upload the file, then restart
Filtering Service:
curl -k -u admin:<password> -X PUT -F "file=@./
master.html" https://<c_interface>/wse/
customblockpage/file/en
curl -k -u admin:<password> -X PUT https://
<c_interface>/wse/admin/filter/stop
curl -k -u admin:<password> -X PUT https://
<c_interface>/wse/admin/filter/start
Block page changes do not go into effect until Filtering Service has restarted.
Warning
Some HTML editors modify HTML code, which could
corrupt the files and cause problems displaying the block
messages. Make sure to use an editor that will not insert
changes beyond those you intend to make.
Creating Custom Block Pages 11
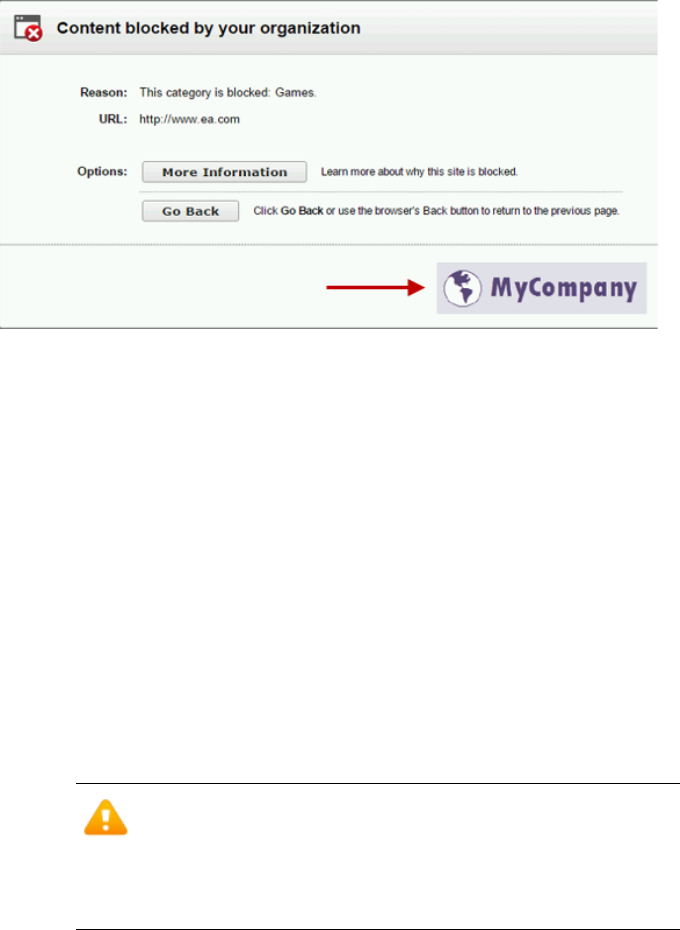
Change the block page logo
Custom Block Pages | Web Protection Solutions | v8.4.x | 31-July-2017
The master.html file also includes the HTML code used to display a Forcepoint logo
on the block page. You can replace this with a custom image of your choice.
To update the logo in the master.html file:
1. Open the copy of the file in the Websense/BlockPages/<lang_code>/Custom
directory (Windows or Linux servers), or download a copy of the file from your
appliance:
curl -k -u admin:<password> -X GET https://
<c_interface>/wse/customblockpage/file/default/<Lang>/
master.html
2. Copy an image file containing your organization’s logo to the BlockPages/
Images folder:
curl -k -u admin:<password> -X PUT -F "file=@./
<filename>" https://<c_interface>/wse/customblockpage/
images
3. Open the copy of master.html in a a text editor or HTML editor.
4. Edit the following line to replace the Forcepoint logo with your organization’s
logo:
<img title="Forcepoint" src="/Images/logo_block_page.png"
alt="Forcepoint Logo" ... >
Warning
Some HTML editors modify HTML code, which could
corrupt the files and cause problems displaying the block
messages. Make sure to use an editor that will not insert
changes beyond those you intend to make.
Creating Custom Block Pages 12
■ Replace logo_block_page.png with the location and name of the image file
you want to display (for example, your organization’s logo).
■ Replace the values of the title parameter and alt parameter to accurately
describe the new image.
For example:
<img title="MyCompany" src="/Images/
mycompany_logo_block_page.png" alt="MyCompany Logo" ... >
The default block page logo is 228 pixels wide by 54 pixels high. If you change
the size of the logo dramatically, additional HTML or CSS changes may be
needed to ensure that the logo and other elements of the page display properly.
5. Save and close the file.
6. Do one of the following to apply your changes:
■ For Filtering Service instances on Windows and Linux servers, use the
Status > Deployment page in the Web module of the Forcepoint Security
Manager to restart Filtering Service.
■ For Filtering Service instances on appliances, first upload the file, then restart
Filtering Service:
curl -k -u admin:<password> -X PUT -F "file=@./
master.html" https://<c_interface>/wse/
customblockpage/file/<lang_code>
curl -k -u admin:<password> -X PUT https://
<c_interface>/wse/admin/filter/stop
curl -k -u admin:<password> -X PUT https://
<c_interface>/wse/admin/filter/start
Block page changes do not go into effect until Filtering Service has restarted.
Creating Custom Block Pages 13
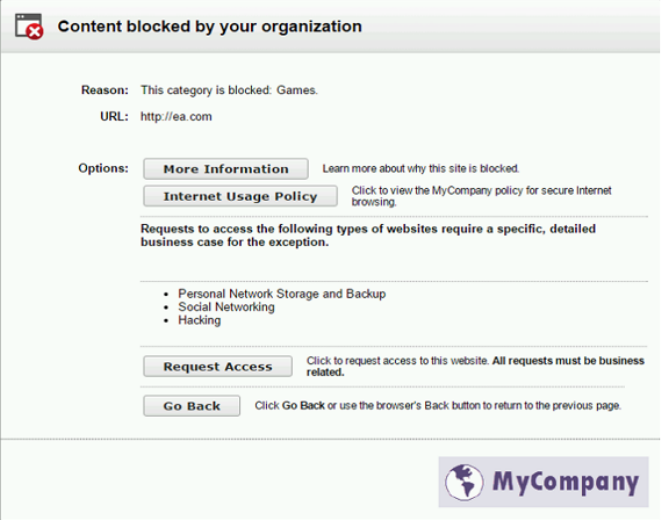
Custom block page code examples
Custom Block Pages | Web Protection Solutions | v8.4.x | 31-July-2017
There are a number of ways that you can customize block pages.
In the following example, the blockFrame.html file has been updated to add 2 new
buttons: one that links to an Internet usage policy document, and one that submits a
request to permit access to a blocked website.
Some text has also been added to the page to give guidance about submitting requests
to access a blocked website.
The sample code has been added after the “more info” section of the block file code.
This section starts with:
<!-- MORE INFO section -->
It ends with:
$*WS_ACEINSIGHT_LINK-END*$
The following section of sample code was inserted to create the button that links to the
Internet Usage Policy document:
<table class="first-option" id="usage-policy">
<tr>
<td>
<input type="button" onclick="window.open('//
www.mycompany.com/documents/internal/
Creating Custom Block Pages 14
internet_usage_policy.pdf','_blank');"value="Internet Usage
Policy" id="isp_link" class="ws_btn">
</td>
<td>
<span class="ws_btn_desc">Click to view the
MyCompany policy for secure Internet browsing.</span>
</td>
</tr>
</table>
The next section of code adds the guidance about requesting access to a blocked
website:
<p class="option">
<strong>Requests to access the following types of websites
require a specific, detailed business case for the
exception.</strong></p>
<p>
<ul class="option">
<li>Personal Network Storage and Backup</li>
<li>Social Networking</li>
<li>Hacking</li>
</ul>
</p>
And finally, a second button offers the chance to submit the request for access directly
to the appropriate destination:
<table class="option" id="permitReq">
<tr>
<td>
<input type="button" onclick="window.open('//
helpdesk.mycompany.com/kinetic/
DisplayPage?name=URLunblock&date=$*WS_DATE*$&username=$*WS_U
SERNAME*$&url=$*WS_URL*$&category=$*WS_CATEGORY*$','_blank')
;"value="Request Access" id="unblock_btn" class="ws_btn">
</td>
<td>
<span class="ws_btn_desc">Click to request access
to this website. <strong>All requests must be business
related.</strong></span>
</td>
</tr>
</table>
Creating Custom Block Pages 15
Block page content variables
Custom Block Pages | Web Protection Solutions | v8.4.x | 31-July-2017
Content variables control the information displayed on HTML block pages. The
following variables are included with the default block message code.
To use a variable, insert the variable name between the $* *$ symbols in the
appropriate HTML tag:
<p id="UserName">$*WS_USERNAME*$</p>
Here, WS_USERNAME is the variable.
The block message code includes additional variables, described below. You may find
some of these variables useful in constructing your own, custom block messages.
When you see these variables in default block message files, however, please do not
modify them. Because Filtering Service uses these variables when processing blocked
requests, they must remain in place.
Variable Name Content Displayed
WS_DATE Current date
WS_USERNAME Current user name (excluding domain
name)
WS_USERDOMAIN Domain name for the current user
WS_IPADDR IP address of the requesting source
machine
WS_WORKSTATION Machine name of the blocked computer
(if no name is available, IP address is
displayed)
WS_CASB_IS_BLOCK If the page was blocked as a cloud
application, “true”. If the page was not
blocked as a cloud application, “false”.
WS_CASB_RISKLEVEL Low, medium, or high risk level.
WS_CASB_APP Name of the cloud application.
WS_CASB_APPTYPE Category of the cloud application.
Variable Name Purpose
WS_URL Displays the requested URL
WS_BLOCKREASON Displays why the site was blocked (i.e.,
which action was applied)
WS_ISSECURITY Indicates whether the requested site
belongs to any of the categories in the
Security Risk class. When TRUE, the
security block page is displayed.
Creating Custom Block Pages 16
WS_PWOVERRIDECGIDATA Populates an input field in the block
page HTML code with information
about use of the Password Override
button
WS_QUOTACGIDATA Populates an input field in the block
page HTML code with information
about use of the Use Quota Time button
WS_PASSWORDOVERRIDE-
BEGIN,
WS_PASSWORDOVERRIDE-END
Involved in activating password
override functionality
WS_MOREINFO Displays detailed information (shown
after the More information link is
clicked) about why the requested site
was blocked
WS_POLICYINFO Populates the hidden “more
information” section in block page
source code
WS_MOREINFOCGIDATA Sends data to Filtering Service about use
of the More information link
WS_QUOTATIME Displays the amount of quota time
remaining for the requesting client
WS_QUOTAINTERVALTIME Displays quota session length
configured for the requesting client
WS_QUOTABUTTONSTATE Indicates whether the Use Quota Time
button is enabled or disabled for a
particular request
WS_SESSIONID Acts as an internal identifier associated
with a request
WS_TOPFRAMESIZE Indicates the size (as a percentage) of the
top portion of a block page sent by a
custom block server, if one is configured
WS_BLOCKMESSAGE_PAGE Indicates the source to be used for a
block page’s top frame
WS_CATEGORY Displays the category of the blocked
URL
WS_CATEGORYID The unique identifier for the requested
URL category
Variable Name Purpose
Creating Custom Block Pages 17
Reverting to the default block pages
Custom Block Pages | Web Protection Solutions | v8.4.x | 31-July-2017
If users experience errors after you implement customized block messages, you can
restore the default block messages by deleting the custom block files and restarting
Filtering Service. If there are no files in the custom directory, Filtering Service
automatically resumes using the default block files.
Windows and Linux servers
On Windows and Linux servers, you can directly delete files from the Custom
directory:
1. Delete all the files from the Websense/BlockPages/<lang_code>/Custom
directory.
2. Use the Status > Deployment page in the Web module of the Forcepoint Security
Manager to restart Filtering Service.
As an alternative, you can use either the Windows Services tool or the Linux
WebsenseDaemonControl tool to restart the service.
Forcepoint appliances
On both V Series and X Series appliances, use the appliance API to delete custom
block page files.
For information about the syntax used in the sample commands below, see the
introduction to Working with block page files on appliances, page 8.
To delete the files and revert to the default block pages:
1. Use the “delfile” command to delete files in the Custom directory, one at a time:
curl -k -u admin:<password> -X PUT https://<c_interface>/
wse/customblockpage/delfile/<lang_code>/<file_name>
For example:
curl -k -u admin:<password> -X PUT https://10.115.75.30/
wse/customblockpage/delfile/en/master.html
2. After deleting the files, stop Filtering Service:
curl -k -u admin:<password> -X PUT https://<c_interface>/
wse/admin/filter/stop
3. Start Filtering Service:
curl -k -u admin:<password> -X PUT https://<c_interface>/
wse/admin/filter/start
For the complete list of files, see Get started with block page elements, page 2.
Creating Custom Block Pages 18
©2017 Forcepoint. Forcepoint and the FORCEPOINT logo are trademarks of Forcepoint.
Raytheon is a registered trademark of Raytheon Company. All other trademarks used in this
document are the property of their respective owners.
