
Page 1 / Driving Automation and Efciency with NinjaOne Policies
Driving Automation
and Efciency with
NinjaOne Policies

Page 2 / Driving Automation and Efciency with NinjaOne Policies
Creating cohesive policies is a snap with NinjaOne, enabling you to manage endpoints easily
and efciently. In this guide, we’ll cover key policy concepts with real-world examples of how
policies work within the NinjaOne console.
What are policies in NinjaOne?
Policies are NinjaOne’s centralized device management and
automation engine. The policies you set will determine how
NinjaOne manages your devices.
What does a policy contain?
With policies, you’re telling NinjaOne how you want your
endpoints managed on a day-to-day basis. Ninja automatically
executes the actions provided by policies across all related
devices continuously. Policies include endpoint monitoring rules,
automation rules, granular patch management options, security
solution preferences, and data backup & retention.
How does NinjaOne handle policies differently?
With NinjaOne, we use a simple “one policy per device” rule,
giving you more visibility and understanding into how each
device is managed. With other solutions, you may have multiple
policies applied to a single endpoint, making management more
difcult and confusing. Using this single policy method, you get a
more intuitive and efcient experience.
About NinjaOne’s
Policy Functionality
Page 3 / Driving Automation and Efciency with NinjaOne Policies
Ninja includes a concept called policy inheritance which allows
for more standardized and efcient management of devices.
Upon creation, a new policy (child) can be assigned to inherit
another policy (parent) which links the two policies such that
any changes made to the parent policy are reected in the child
policy. This relationship is ongoing and one directional, allowing
you to balance customization needs with standardization and
efcient management.
While the following are not dened policy statuses in Ninja,
policies can be categorized as:
• Standalone policies, which are policies that have neither a
parent nor child policy.
• Root policies are the top-level policies with no parent
policies. These policies dene overall rules for any policies
living under them. Most of your work will be done at the root
level. Once you set up your new traits, you’ll turn them all off
and then turn those rules on or override them at the parent
or child level. Root policies will include every condition,
scheduled script, patch management policy, backup plan,
etc. Anything that applies to more than one device group or
is complex to set up will generally live within the root policy
level.
• Parent policies are the mid-level policies that coordinate
decisions between the different policy levels. Using parent
policies, you can enable or disable traits created at the top
level. As middle management, these policies are just there
to drive additional efciency at the child level.
• Child policies enable device-specic traits. Anything that is
proprietary to an individual client or device group, requiring
specic credentials, or includes anything only applicable to
a small group of routines will generally live within the child
policy level.
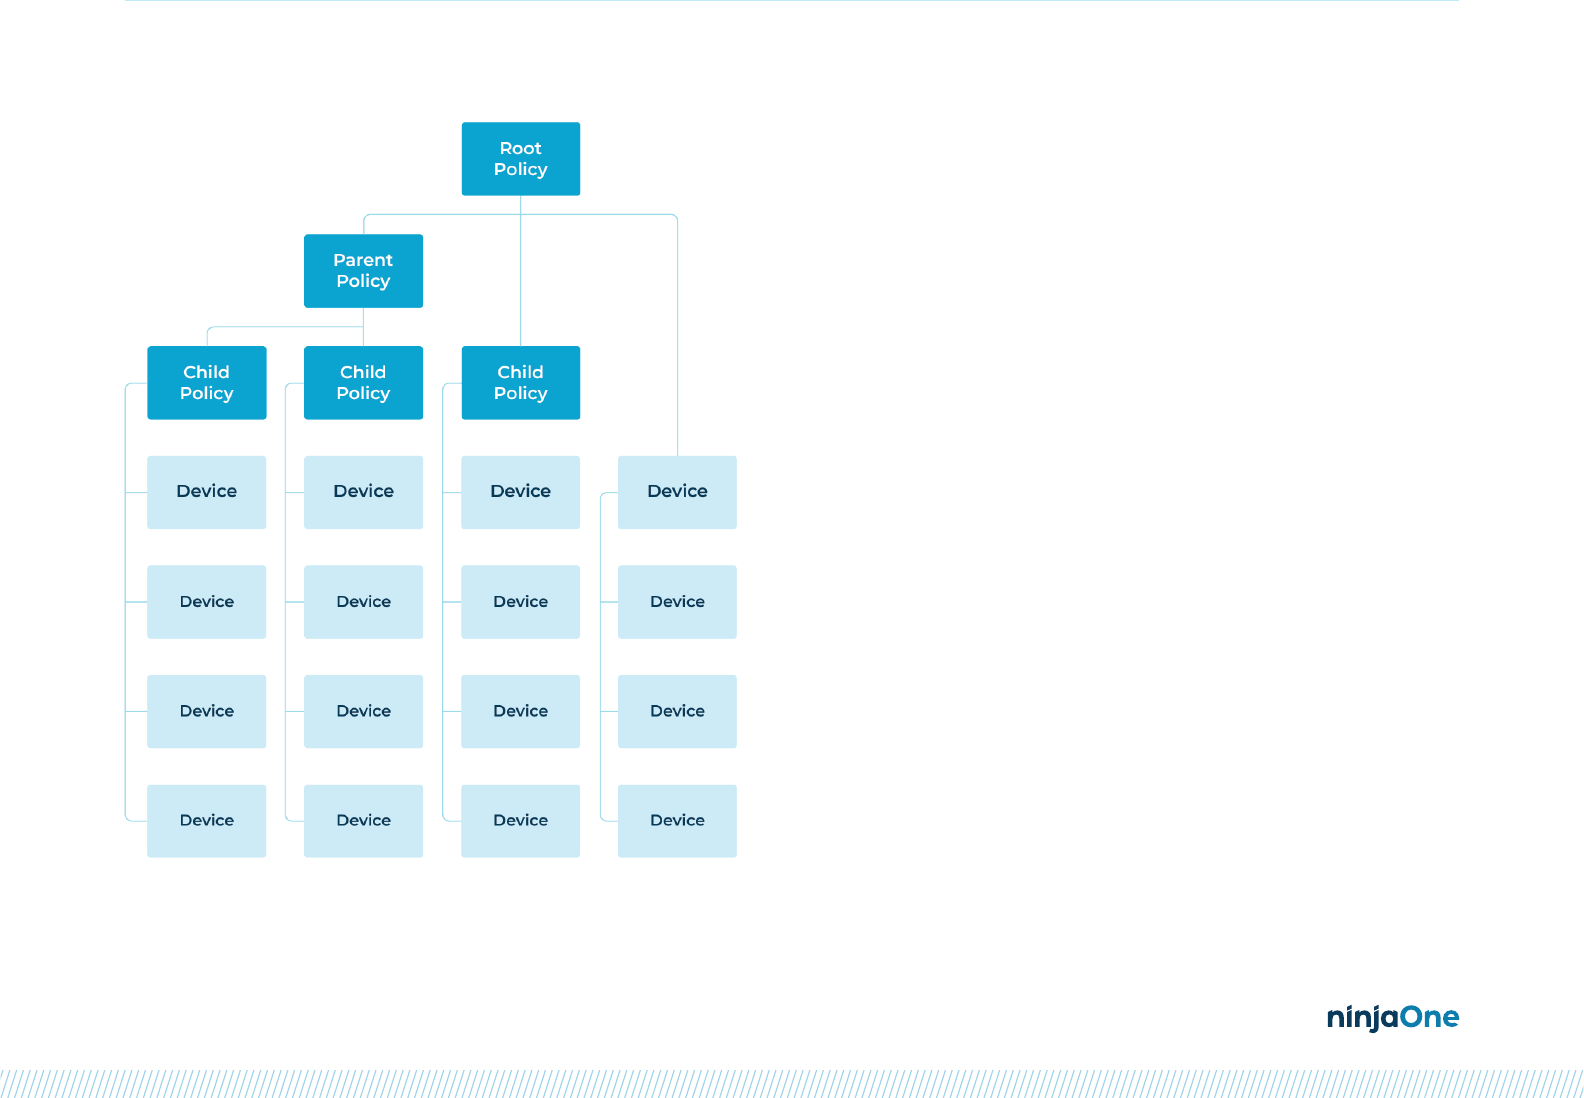
Policy Inheritance
Page 4 / Driving Automation and Efciency with NinjaOne Policies
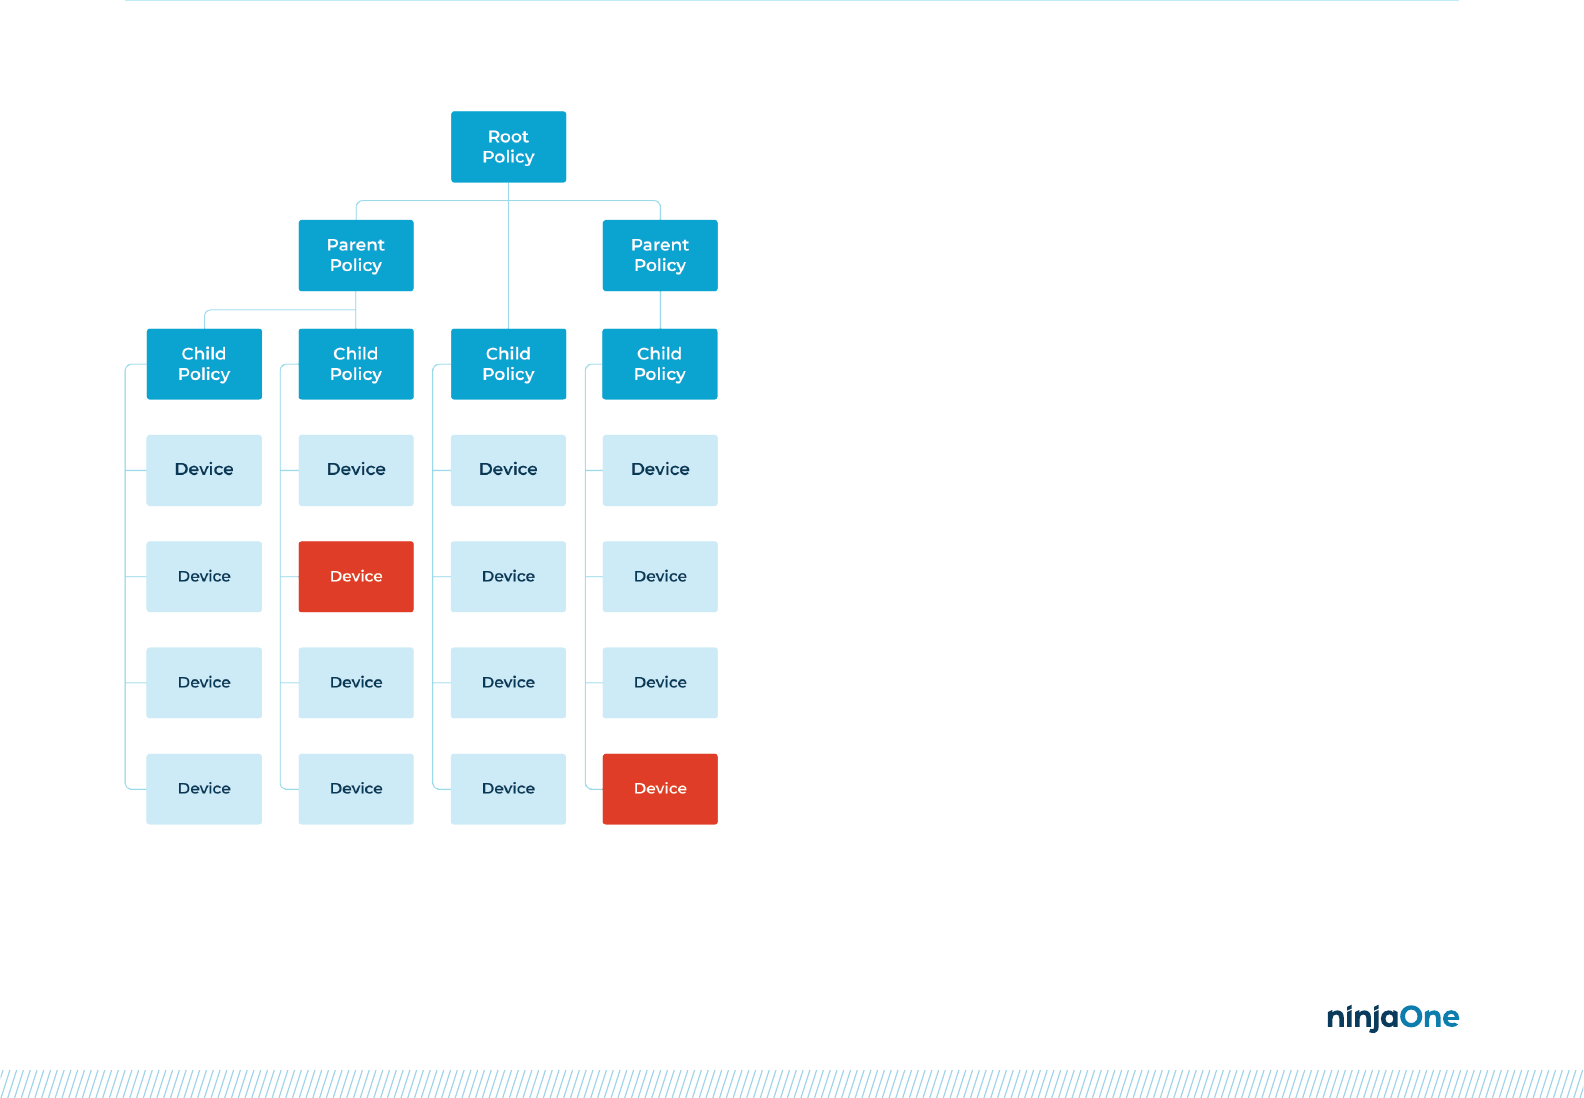
How do these policies interact?
To the left is an example of what a set of policies can look like
within NinjaOne. Note that each device lives under a single
policy rather than under multiple, simplifying operations.
When it comes to the interactions between policies, the
following applies:
• Any changes to a parent or root policy will waterfall down to
the rest of the child policies listed underneath
• Child policies can override decisions made in the parent
policy or add additional traits
• When you make changes to child policies, the parent
policies do not change
• Inheritance can stack to multiple levels, from Root to Child
How do hierarchies affect policy creation?
As you create your policies, it’s important to note that your parent
policies must be built before you create a child policy under it.
Whenever you create any new policy, you have the option to
assign to any other policy, which will then become the parent.
You cannot create a policy then assign it as an inherited policy
down the line. If you’d like to assign it to a parent policy, that will
need to be done before publishing. After publishing, you will not
have the ability to assign to a new parent.
You do have the option to copy policies, but it is strictly a copy
and will not inherit any traits changed by the original policy
that was copied.
Page 5 / Driving Automation and Efciency with NinjaOne Policies
Siloed Policies
Siloed policies are the simplest version of policies that require
the least amount of forethought. Siloed policies are rarely the
best choice for device management in Ninja as each policy is
unrelated, with no consolidation or cross-policy efciency. There
are almost always some efciencies to be gained by having a
parent policy for each device role.
This also means that any workow updates that need to be
made, like changes to patching schedules or backup rules, will
need to be manually duplicated across any relevant policies
rather than taking advantage of an overarching parent policy.
This kind of structure can work for very simple environments but
lacks the efciency of scale as you start adding more devices to
Ninja.
Siloed policies can be effective if:
• All your devices within a role are managed the same way
with no variation between devices / device groups
• Each device group is managed so differently that there
is no efciency benet from consolidating work into a
parent policy
Policy Hierarchies
Now that we’ve established a base level on what you can expect with policy management, let’s take a look at three different
policy structures to compare use cases and benets:
Page 6 / Driving Automation and Efciency with NinjaOne Policies
Global Parent
Global parent structures are a level up from siloed policies, with
policy work consolidated in the global parent level rather than
managing each set of devices through isolated child policies.
This is still a fairly at hierarchy but gives you a bit more depth
and manageability. This structure is best for environments that
benet from exibility and standardization.
By taking advantage of the parent and child structure, you
can drive more efciency. Work that is done at the parent level
will be automatically duplicated to child policies. You should
do as much work as possible in the global parent policy then
make customizations and adjustments at the child policy
level. Workstation management, for example, is often easily
standardized from a monitoring, task automation, AV, and
backup perspective with variations in patching schedules being
most common.
This is the most common policy structure we see with mature
customers and is suitable for most situations.
Page 7 / Driving Automation and Efciency with NinjaOne Policies
Multi-Layer
Multi-layer setups will be the most complicated structure of
the three, adding greater complexity with root, parent, and
child-level policies. This structure can be incredibly effective
in complex but highly structured environments but can also
become complex and difcult to manage if not properly
controlled. Having multiple layers of inheritance allows for a
baseline standard for device management, customization by
device groups, and personalization at scale. In general, you
always want to push congurations as high in the policy tree
as possible and consolidate to as few policies as possible to
achieve your goals.
This policy structure is used most commonly for server
management where you are managing many servers with
different purposes or for MSPs who want to standardize
across clients.
Page 8 / Driving Automation and Efciency with NinjaOne Policies
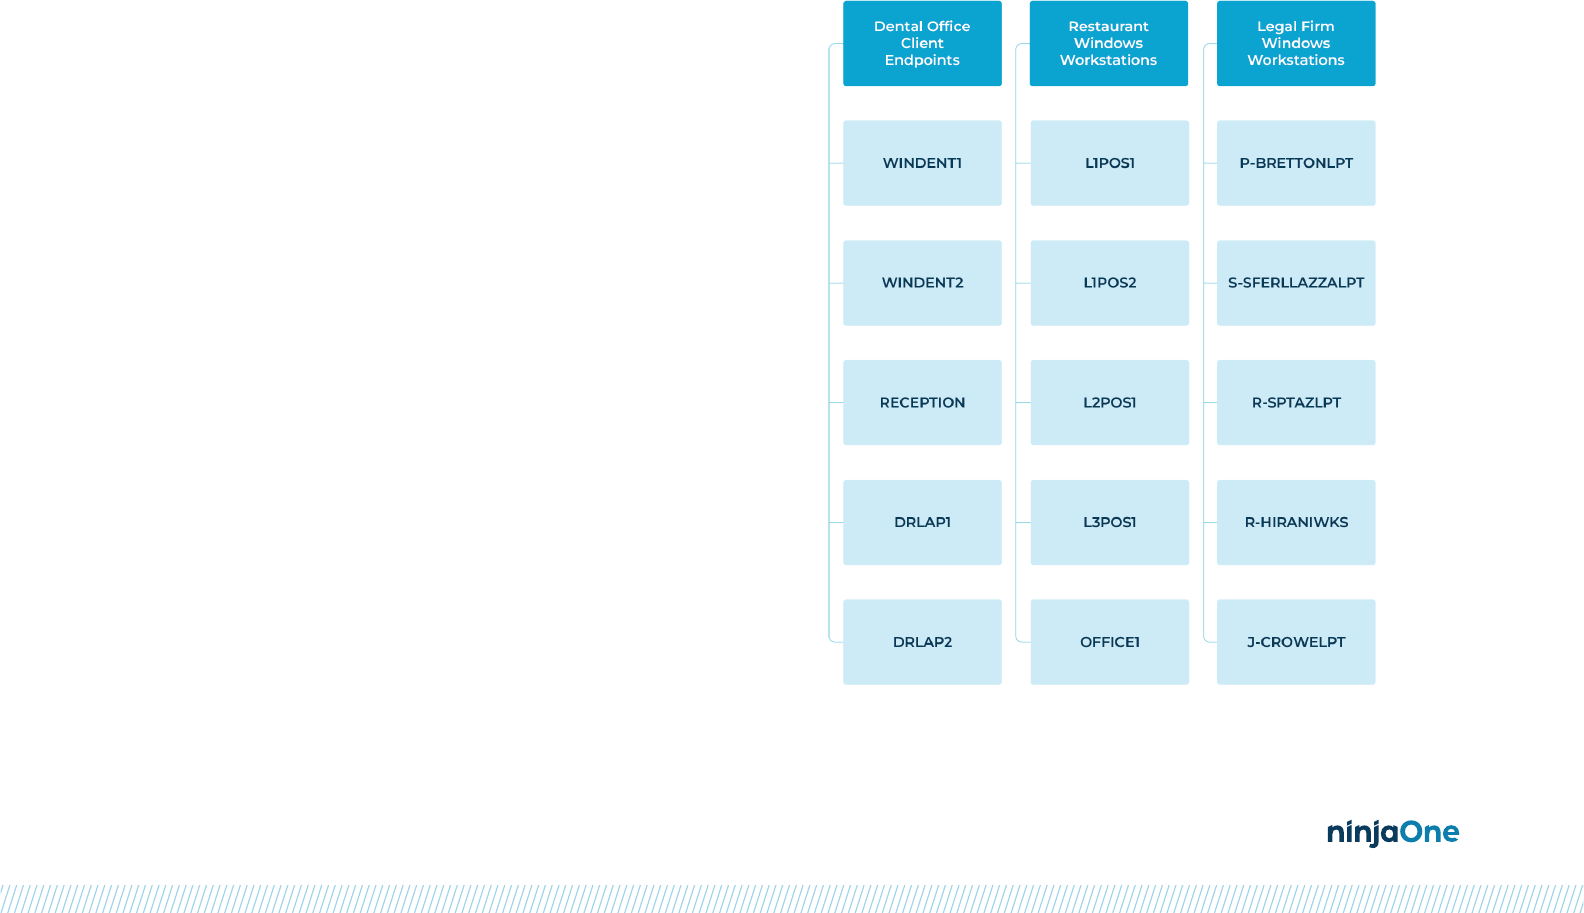
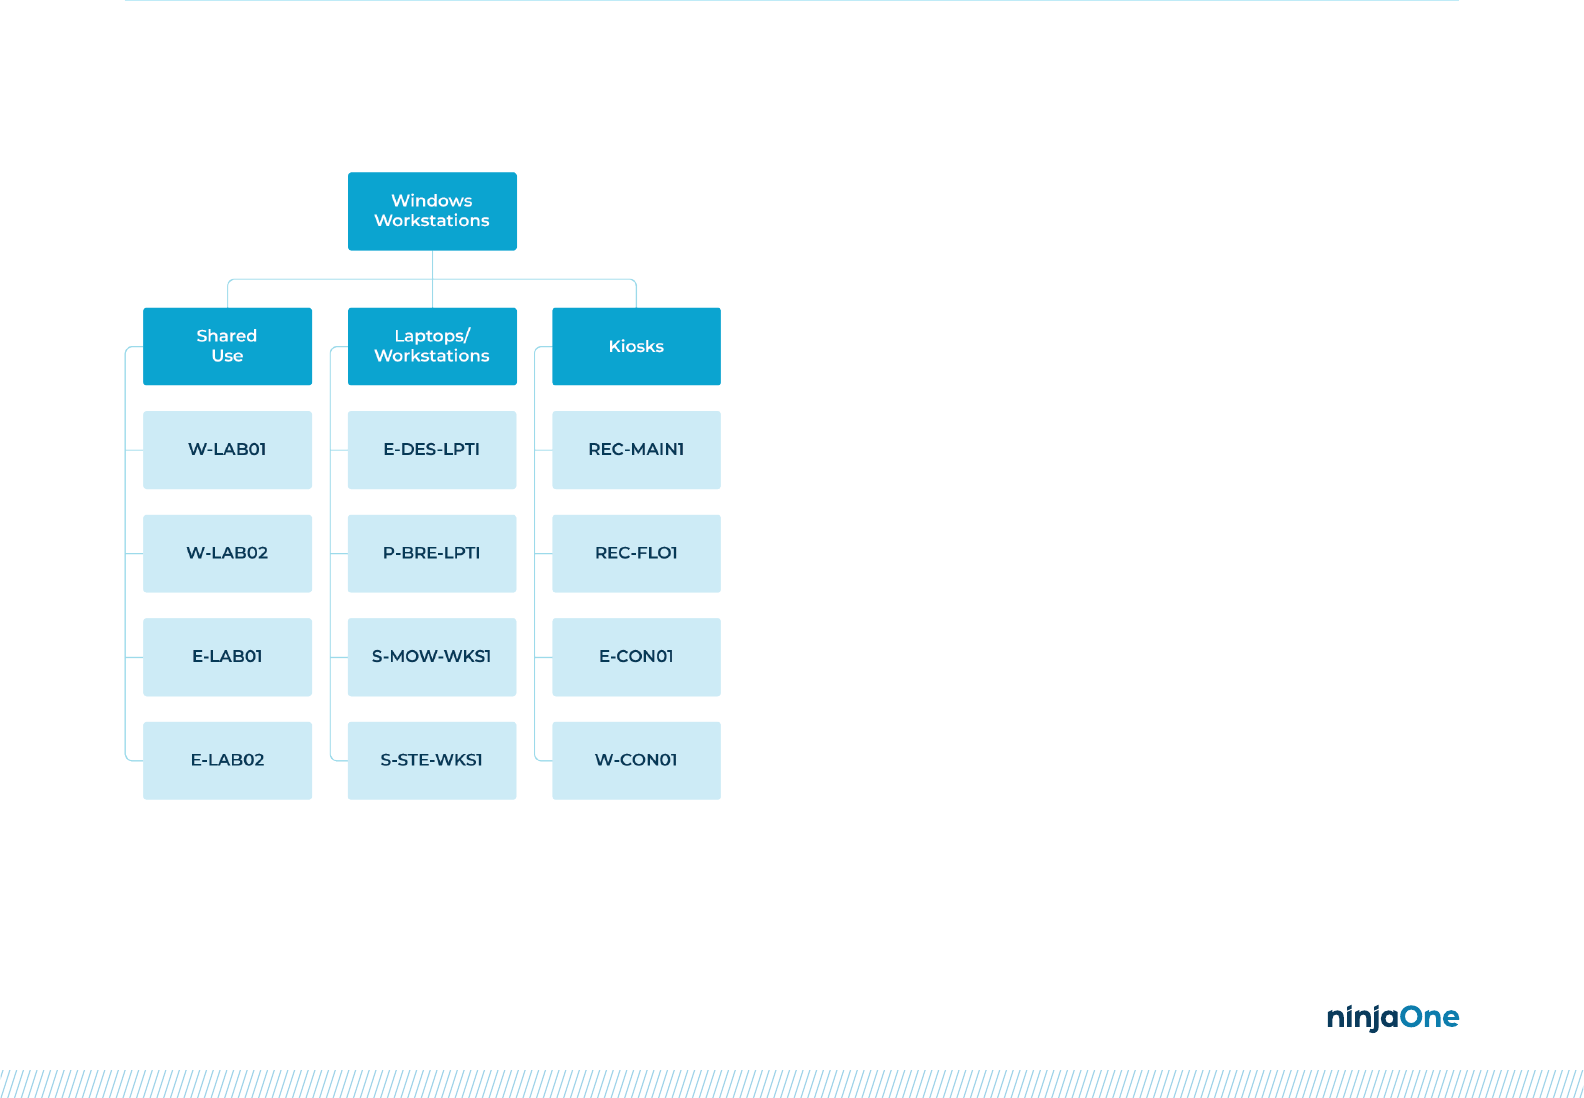
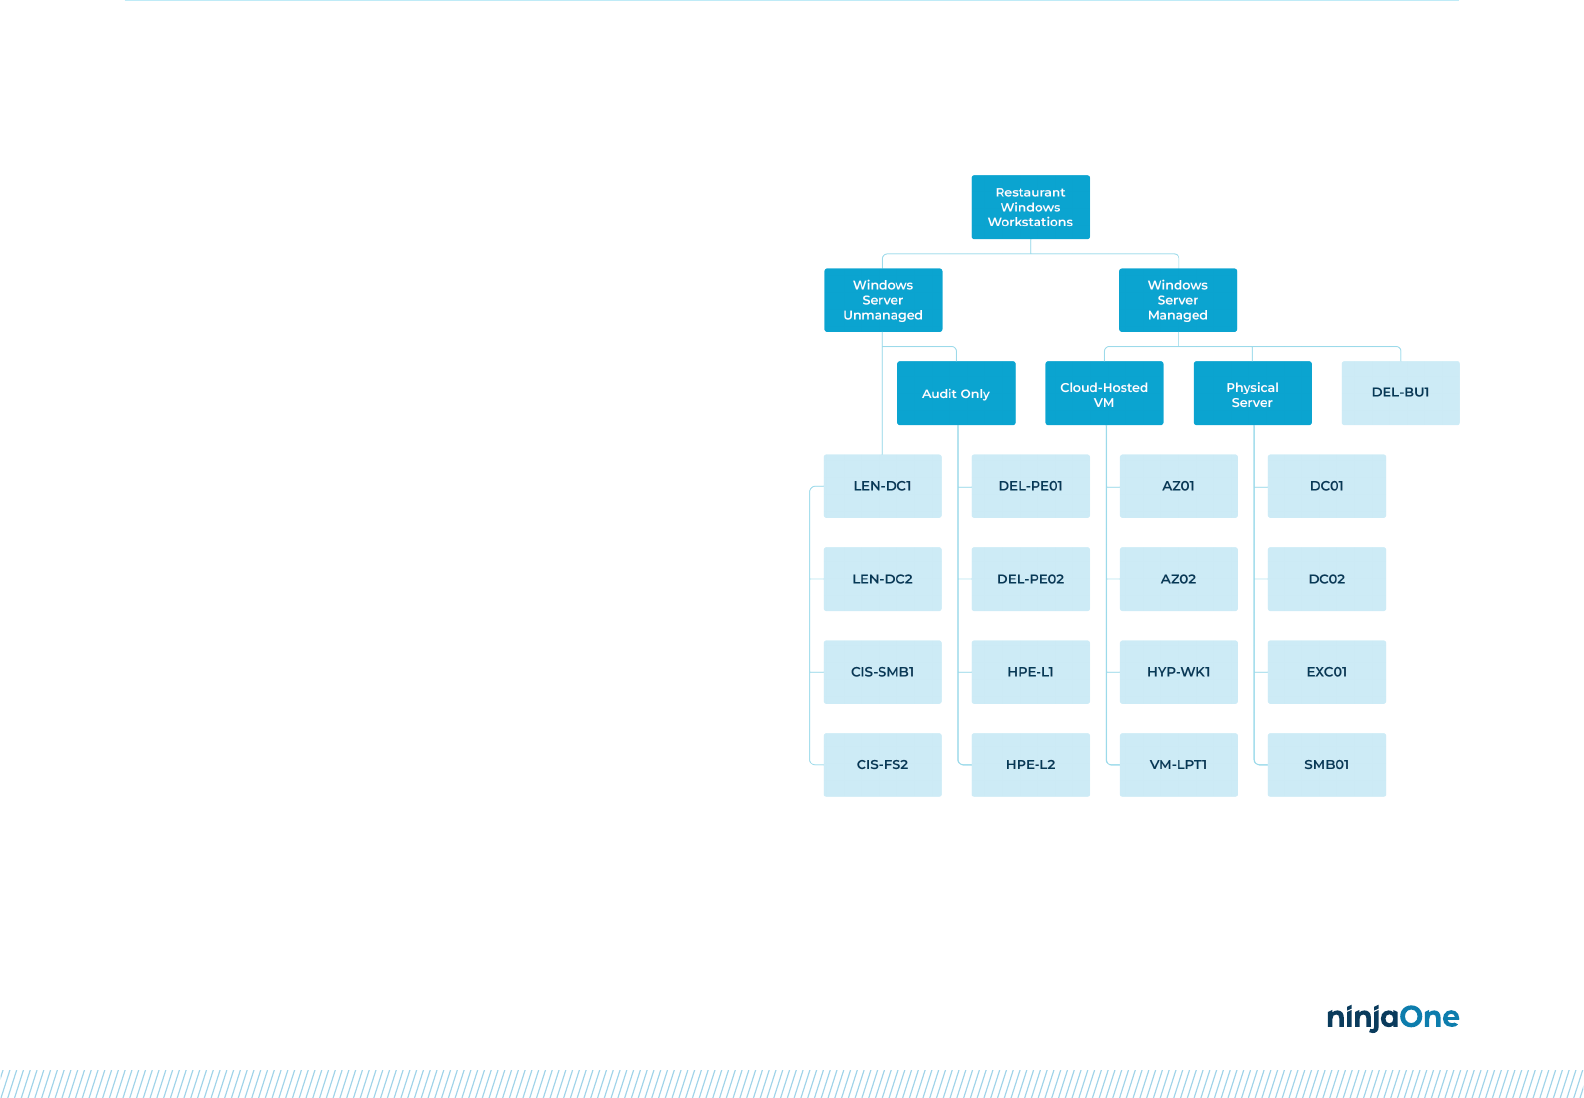
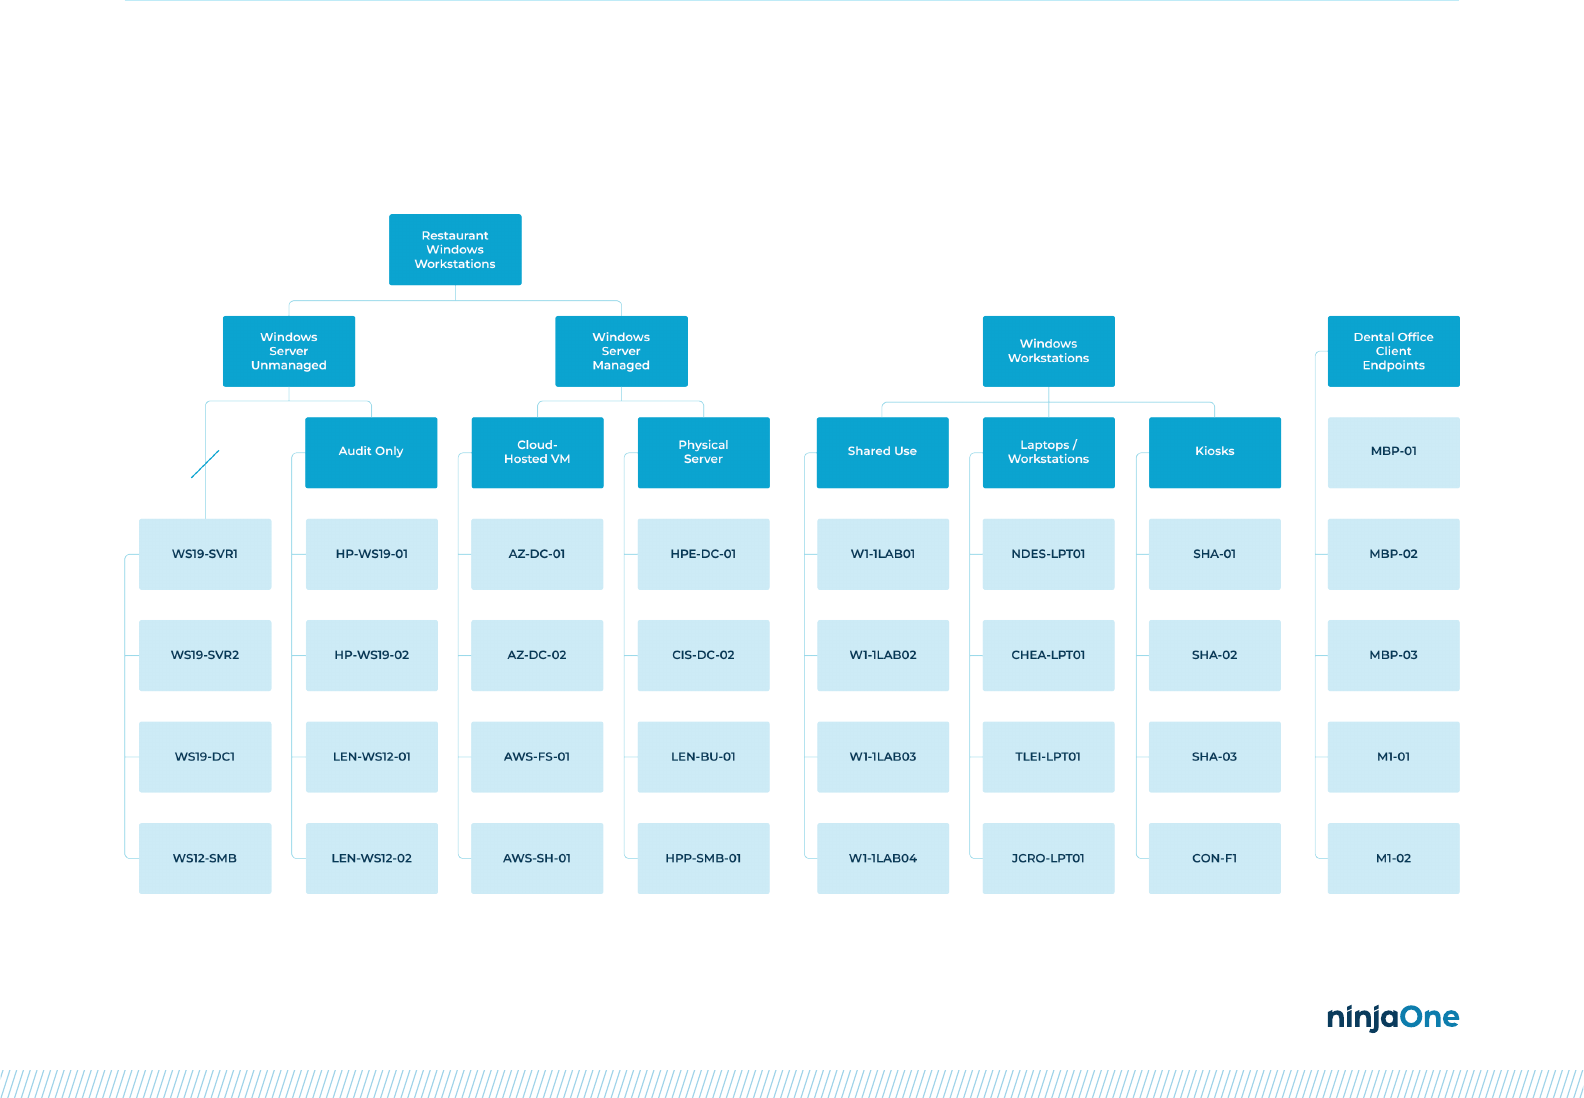
Real World Example
Once you start adding more devices into the Ninja platform, this is what your organization structure
may look like, taking advantage of each type of structure in one cohesive platform:
Page 9 / Driving Automation and Efciency with NinjaOne Policies
Device Overrides
You will always have the opportunity to override policies at the
device level. For example, if you have a particular laptop that
needs to be exempt from the existing patch schedule, you can
override that specic device and put it on a separate patching
schedule. Any policy trait, such as conditions and scripts, can be
added or overridden at the device level.
Overrides will take precedent over policy standards. If you make
an override at the device level and the parent policy is changed,
the override will still take precedent and ignore the change to
the parent policy.
NOTE
Utilizing device overrides is not best practice, as they are harder
to manage and the only way to see any overrides is to go into each
individual device. Use caution when adding device-level overrides.

Page 10 / Driving Automation and Efciency with NinjaOne Policies
As you move forward with policy management and building or
updating your policy structure, here are a few things to consider:
1. Plan, then build
Prior to building or updating your policies, decide on the function
of hierarchies. Remember that you can always plan for growth
but only utilize the layers needed for now.
Questions to ask:
• Are device-facing policies per client? Per subsidiary? Per
functional group?
• Do you need a multi-level hierarchy?
• If using a multi-level structure, what do mid-level policies
translate to?
2. Consolidation is key
Now is the time to invest in root policies. The more work you do
in the planning stage is less work you’ll have to do down the line.
Remember, you can always disable traits in the global parent
by default if it’s not broadly applicable. Use mid-level or device-
facing policies to enable functionality and only enable what’s
needed through the parent and child levels.
3. Standardize everywhere
If you have existing policies, think about if you really need
the differentiation between existing policy groups. Start
consolidating into single policies rather than individual
management. If certain devices need exceptions, make those
exceptions to policies rather than overrides. Minimize the number
of overrides and standalone policies in your structure, as those
exceptions will often lead to more headaches down the line.
4. Having an extra parent policy never hurts
Because NinjaOne doesn’t allow you to retroactively assign
a parent policy, it never hurts to have a global parent across
policies in a device role. Setup a global parent, even if it is blank,
and assign all new policies to that parent policy as they are
created. The likelihood that you cannot push some conditions,
scheduled scripts, or patching best practices to a parent policy for
more efciency is very low.
Policy Management Strategies
Page 11 / Driving Automation and Efciency with NinjaOne Policies
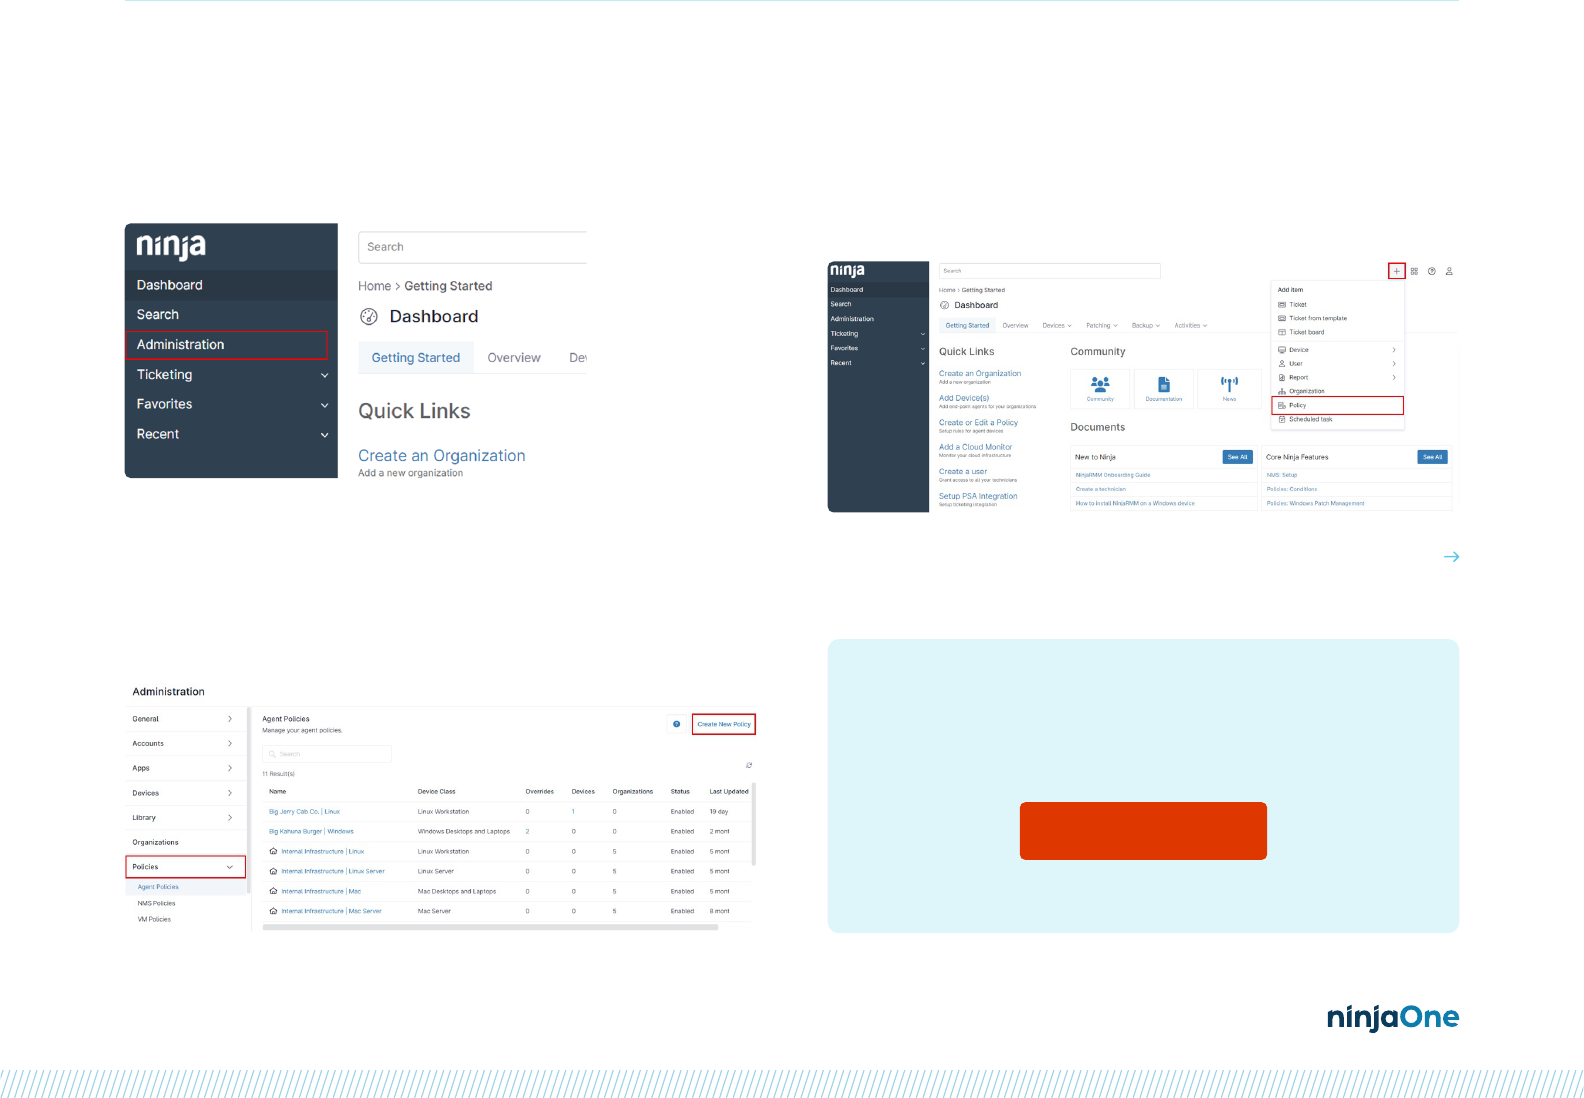
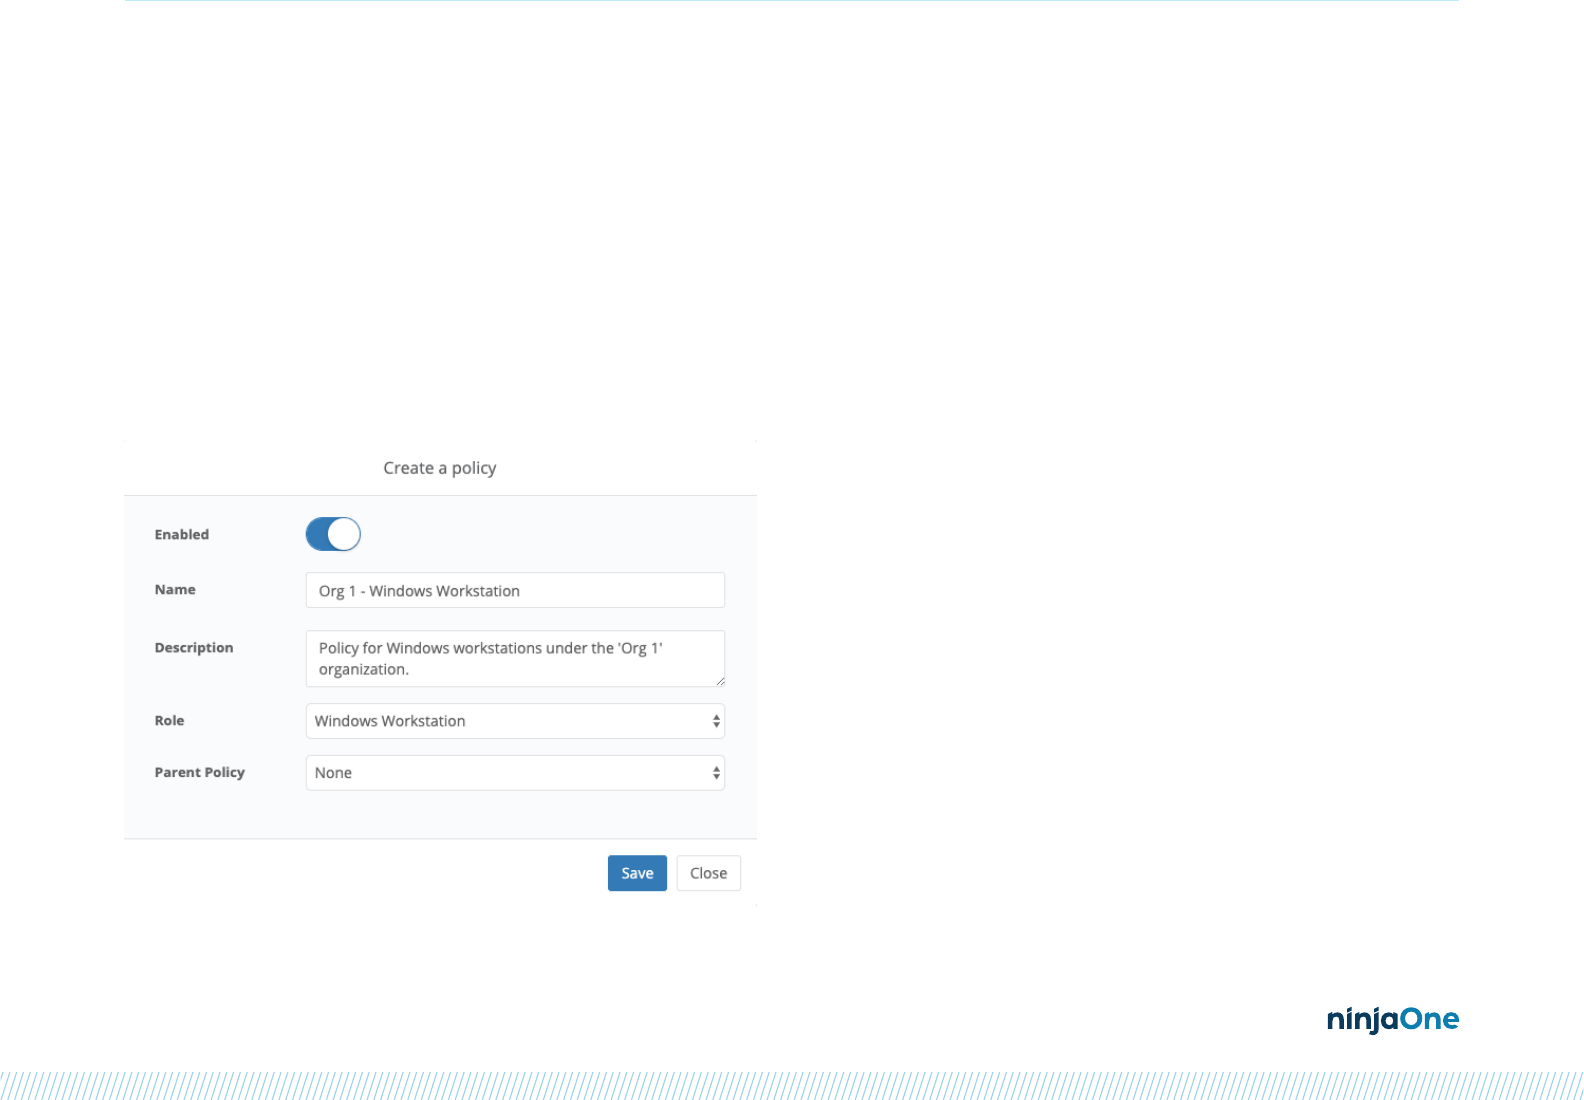
1. Click on the Administration tab
Setting Up a New Policy
2. Select the Policies tab.
3. Select type of policy (Agent, NMS or VM Policy)
4. Click on the Create New Policy button.
5. Alternatively, click on the + icon at the top of the screen and
select Policy.
continued
Driving Automation and Efciency
with NinjaOne Policies
Check the Webinar
Page 12 / Driving Automation and Efciency with NinjaOne Policies
6. Assign your new policy a name, description (optional), role,
and parent policy (optional).
In the last dropdown, you will have an option to assign this
policy to a parent policy, which will be viewable within the
policy itself. Important
IMPORTANT NOTE
You must rst select a role in order for the list of available parent
policies to populate. The policy name has a 100-character limit.
The policy description has a 1000-character limit.
7. Congure the new policy’s settings to your liking.
Any child policies will look like this, with the option to override
on the right-hand side.
To get a live demonstration of this content and in-app
examples, check out the “Driving Automation and Efciency
with NinjaOne Policies” webinar.

ninjaone.com
